WEEK 01
February 6, 2026 - February 12, 2026
Processing Buddha Scans in RawTherapee: White Balancing and Camera Calibrating
I. Setup and installation
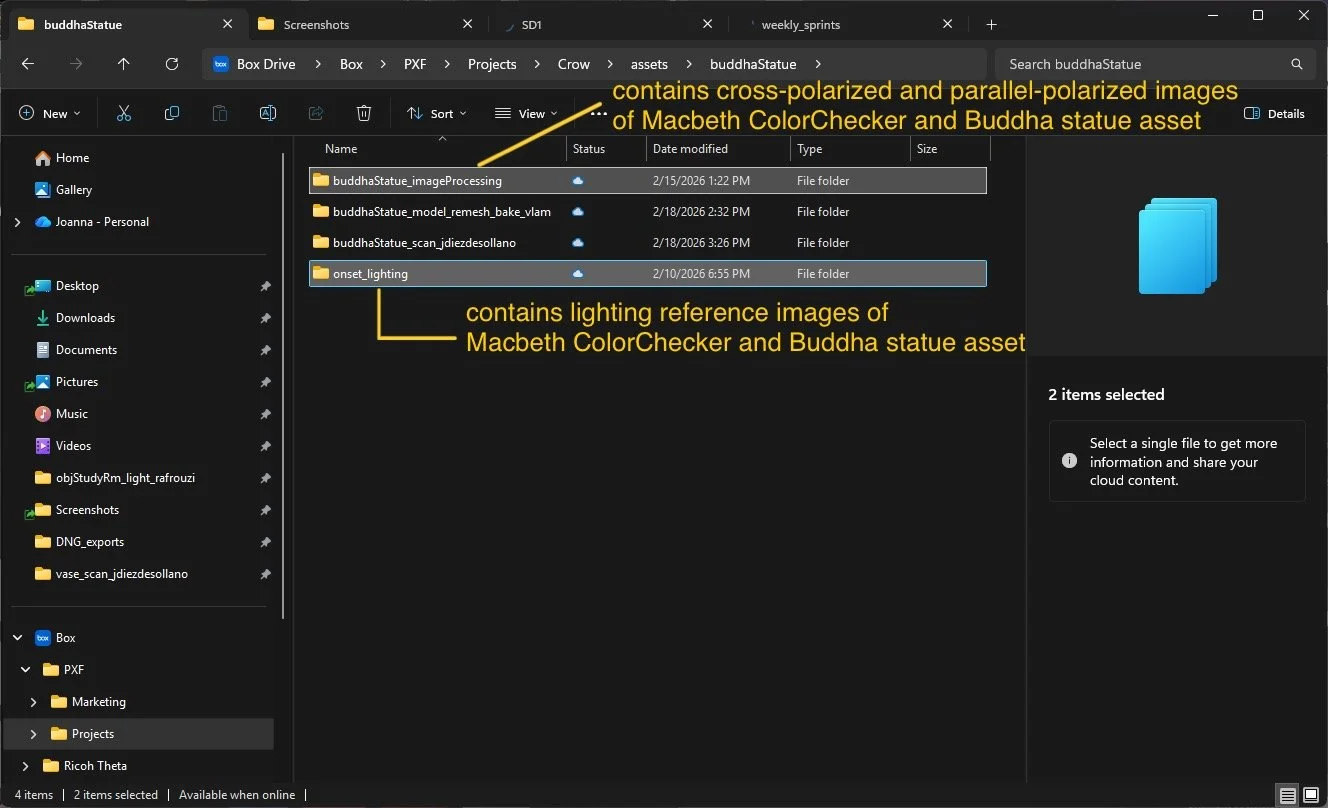
I started by downloading all the necessary software for processing the Buddha scanning session data—photos of lighting reference, cross polarized and parallel polarized photos.


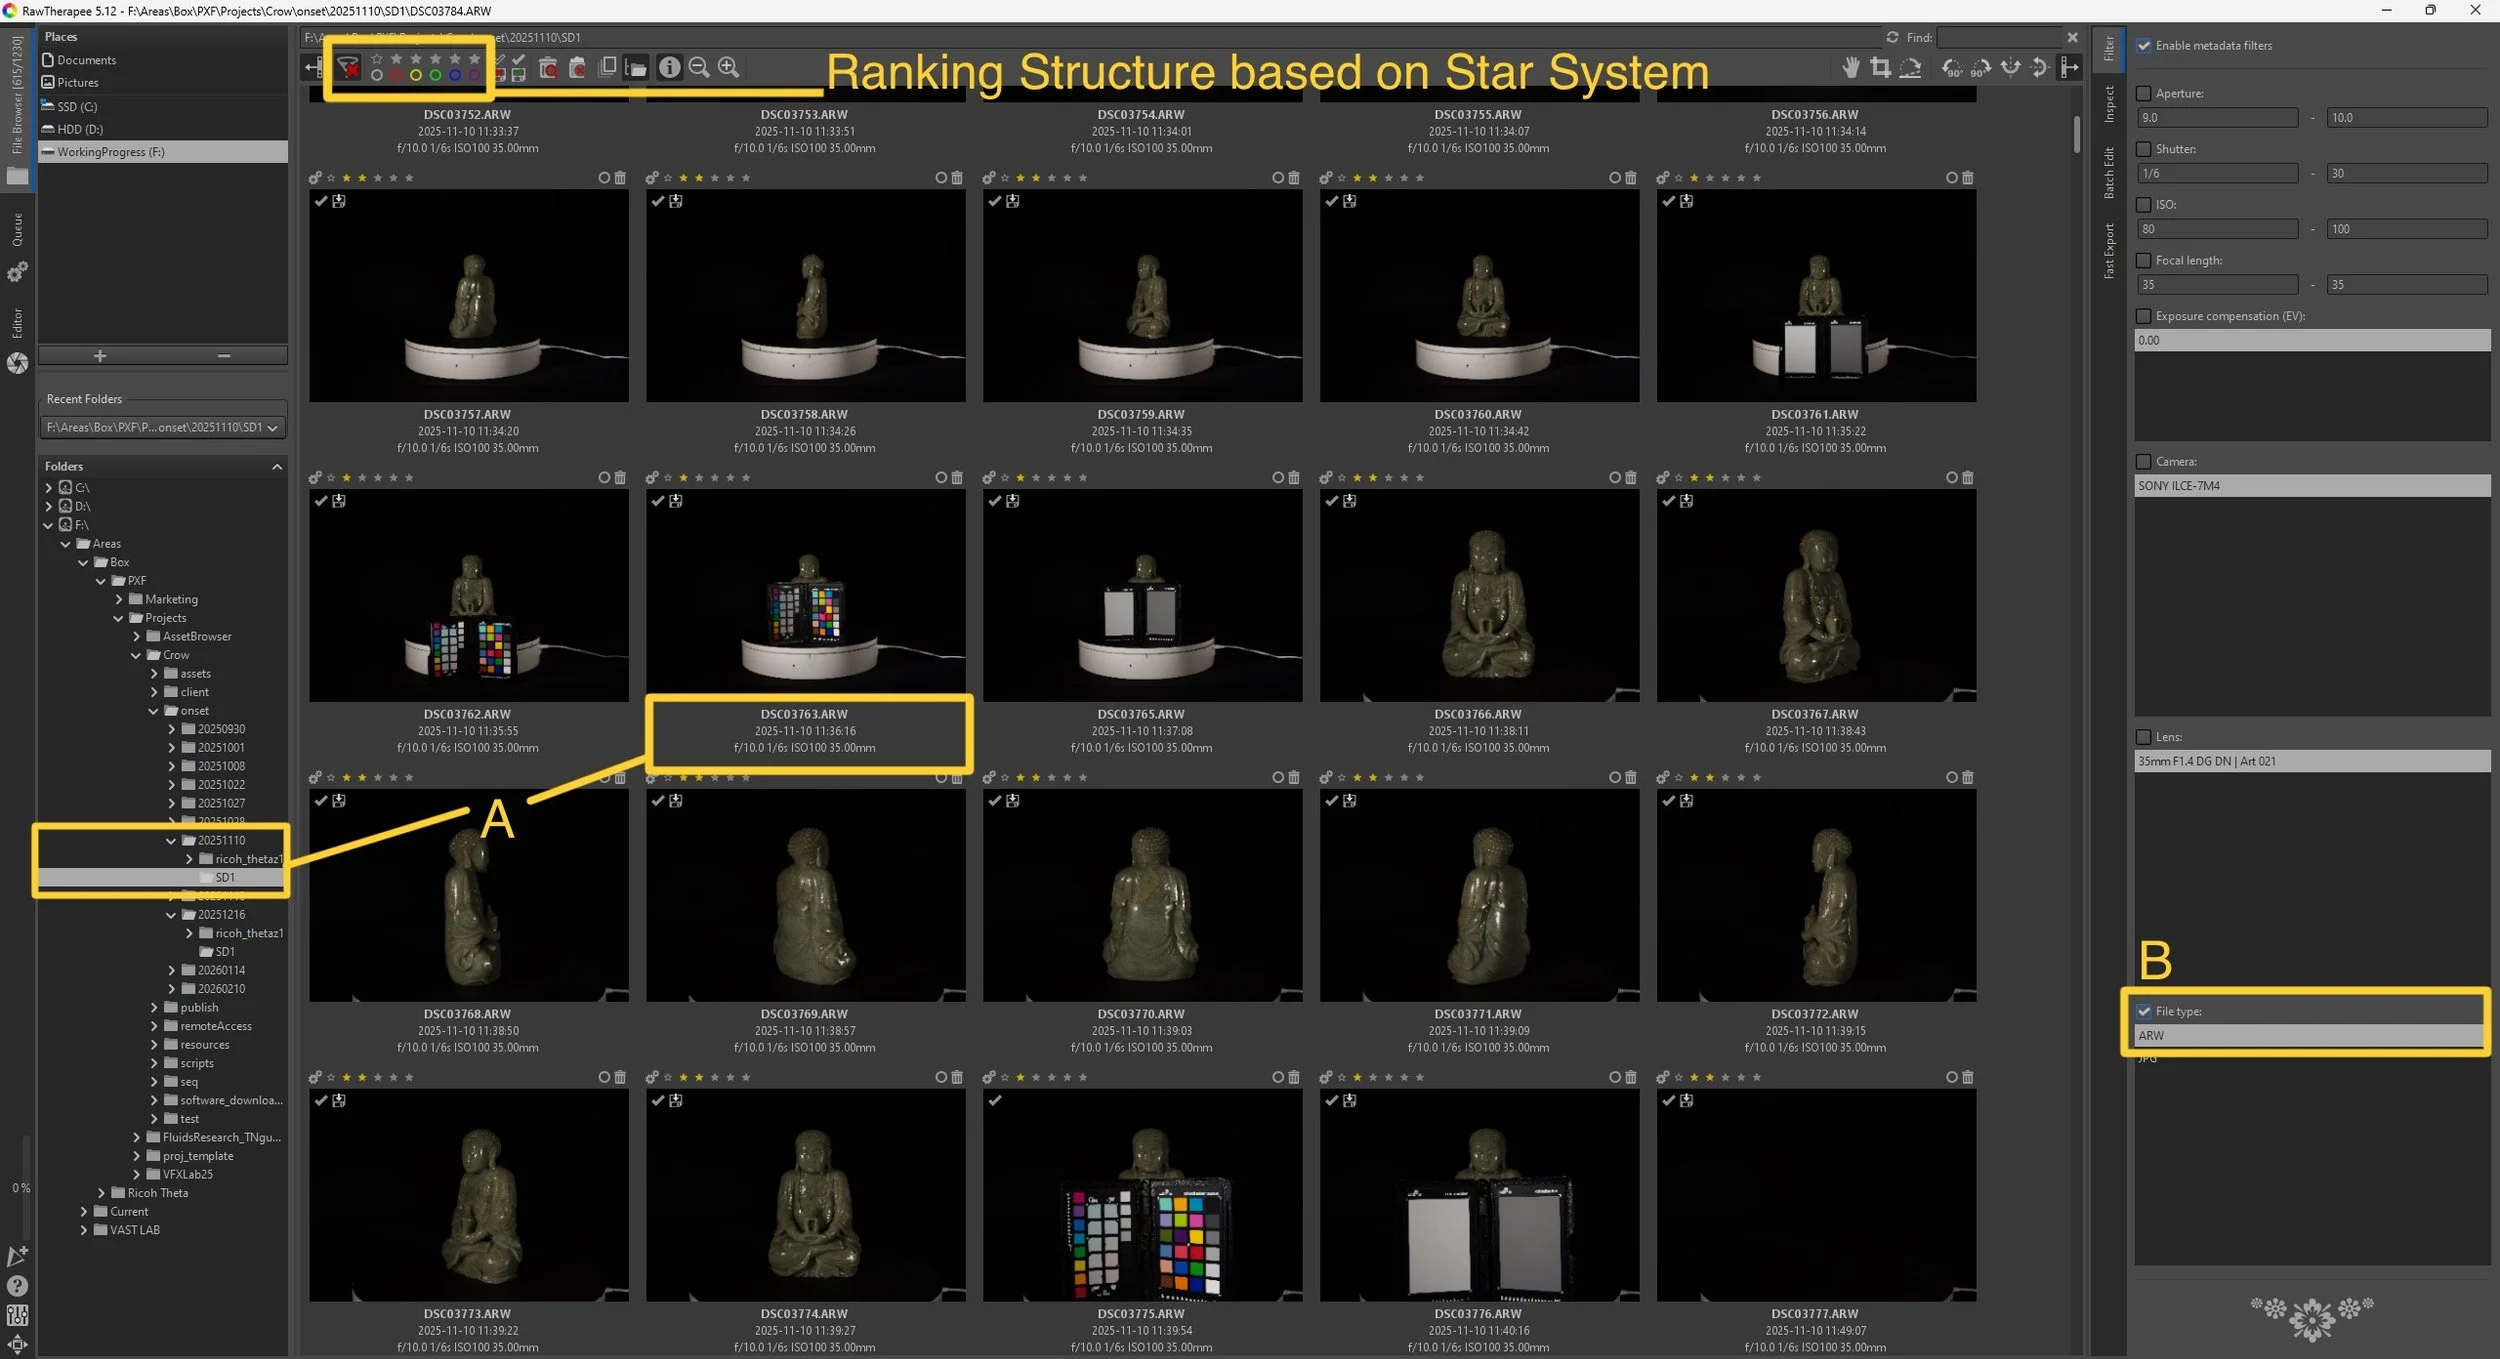
Recommended Ranking Structure
Rank 1 — Lighting reference Macbeth ColorChecker Chart
Used for base image calibration and as white balancing reference for lighting reference photos; used to generate camera calibration profile
Rank 2 — Lighting reference photos
Used as reference for verifying (asset details and lighting setup) during digitizing workflow
Rank 3 — Cross-polarized & Parallel Macbeth ColorChecker Chart
Used to generate separate camera calibration profiles for Cross-polarized (xpol & Parallel-polarized (ppol) ColorChecker
Rank 4 — Cross-polarized scan images
Used primarily for geometry construction and building albedo map (diffuse texture)
Rank 5 — Parallel-polarized scan images
Used for extracting specular reflections and roughness details from asset’s surface.
Light Polarization: Difference between Cross Polarization and Parallel Polarization
Cross-polarized images are captured with the polarizing filters on the lights and the camera oriented perpendicular to each other. This setup removes specular reflections and glare, allowing the camera to capture only the diffuse surface color (true albedo). Because the surface information is cleaner and more consistent, these images improve feature detection and reduce alignment errors, making them the primary images used for the RealityScan Mesh construction workflow.
Parallel-polarized images are captured with the polarizers on the lights and camera aligned in the same direction. This configuration preserves surface reflections, which makes the images useful for calculating specular response and supporting material reconstruction workflows. However, since the retained reflections can interfere with feature matching, these images are not required for geometry construction process.
II. Navigating RawTherapee & Organizing Scanning Data
A. Importing Scan Session
Inside RawTherapee’s File Browser, set the destination path to the scanning session folder to load all captured images.
Each image displays metadata which include:filename
capture timestamp
aperture (F-stop)
shutter speed
ISO
focal length / lens
B. Sorting Images Using Ranking System
Firstly, filter images by file type
Filter images by: ARW (Sony RAW)
This prevents accidental processing of JPG previews or exports.
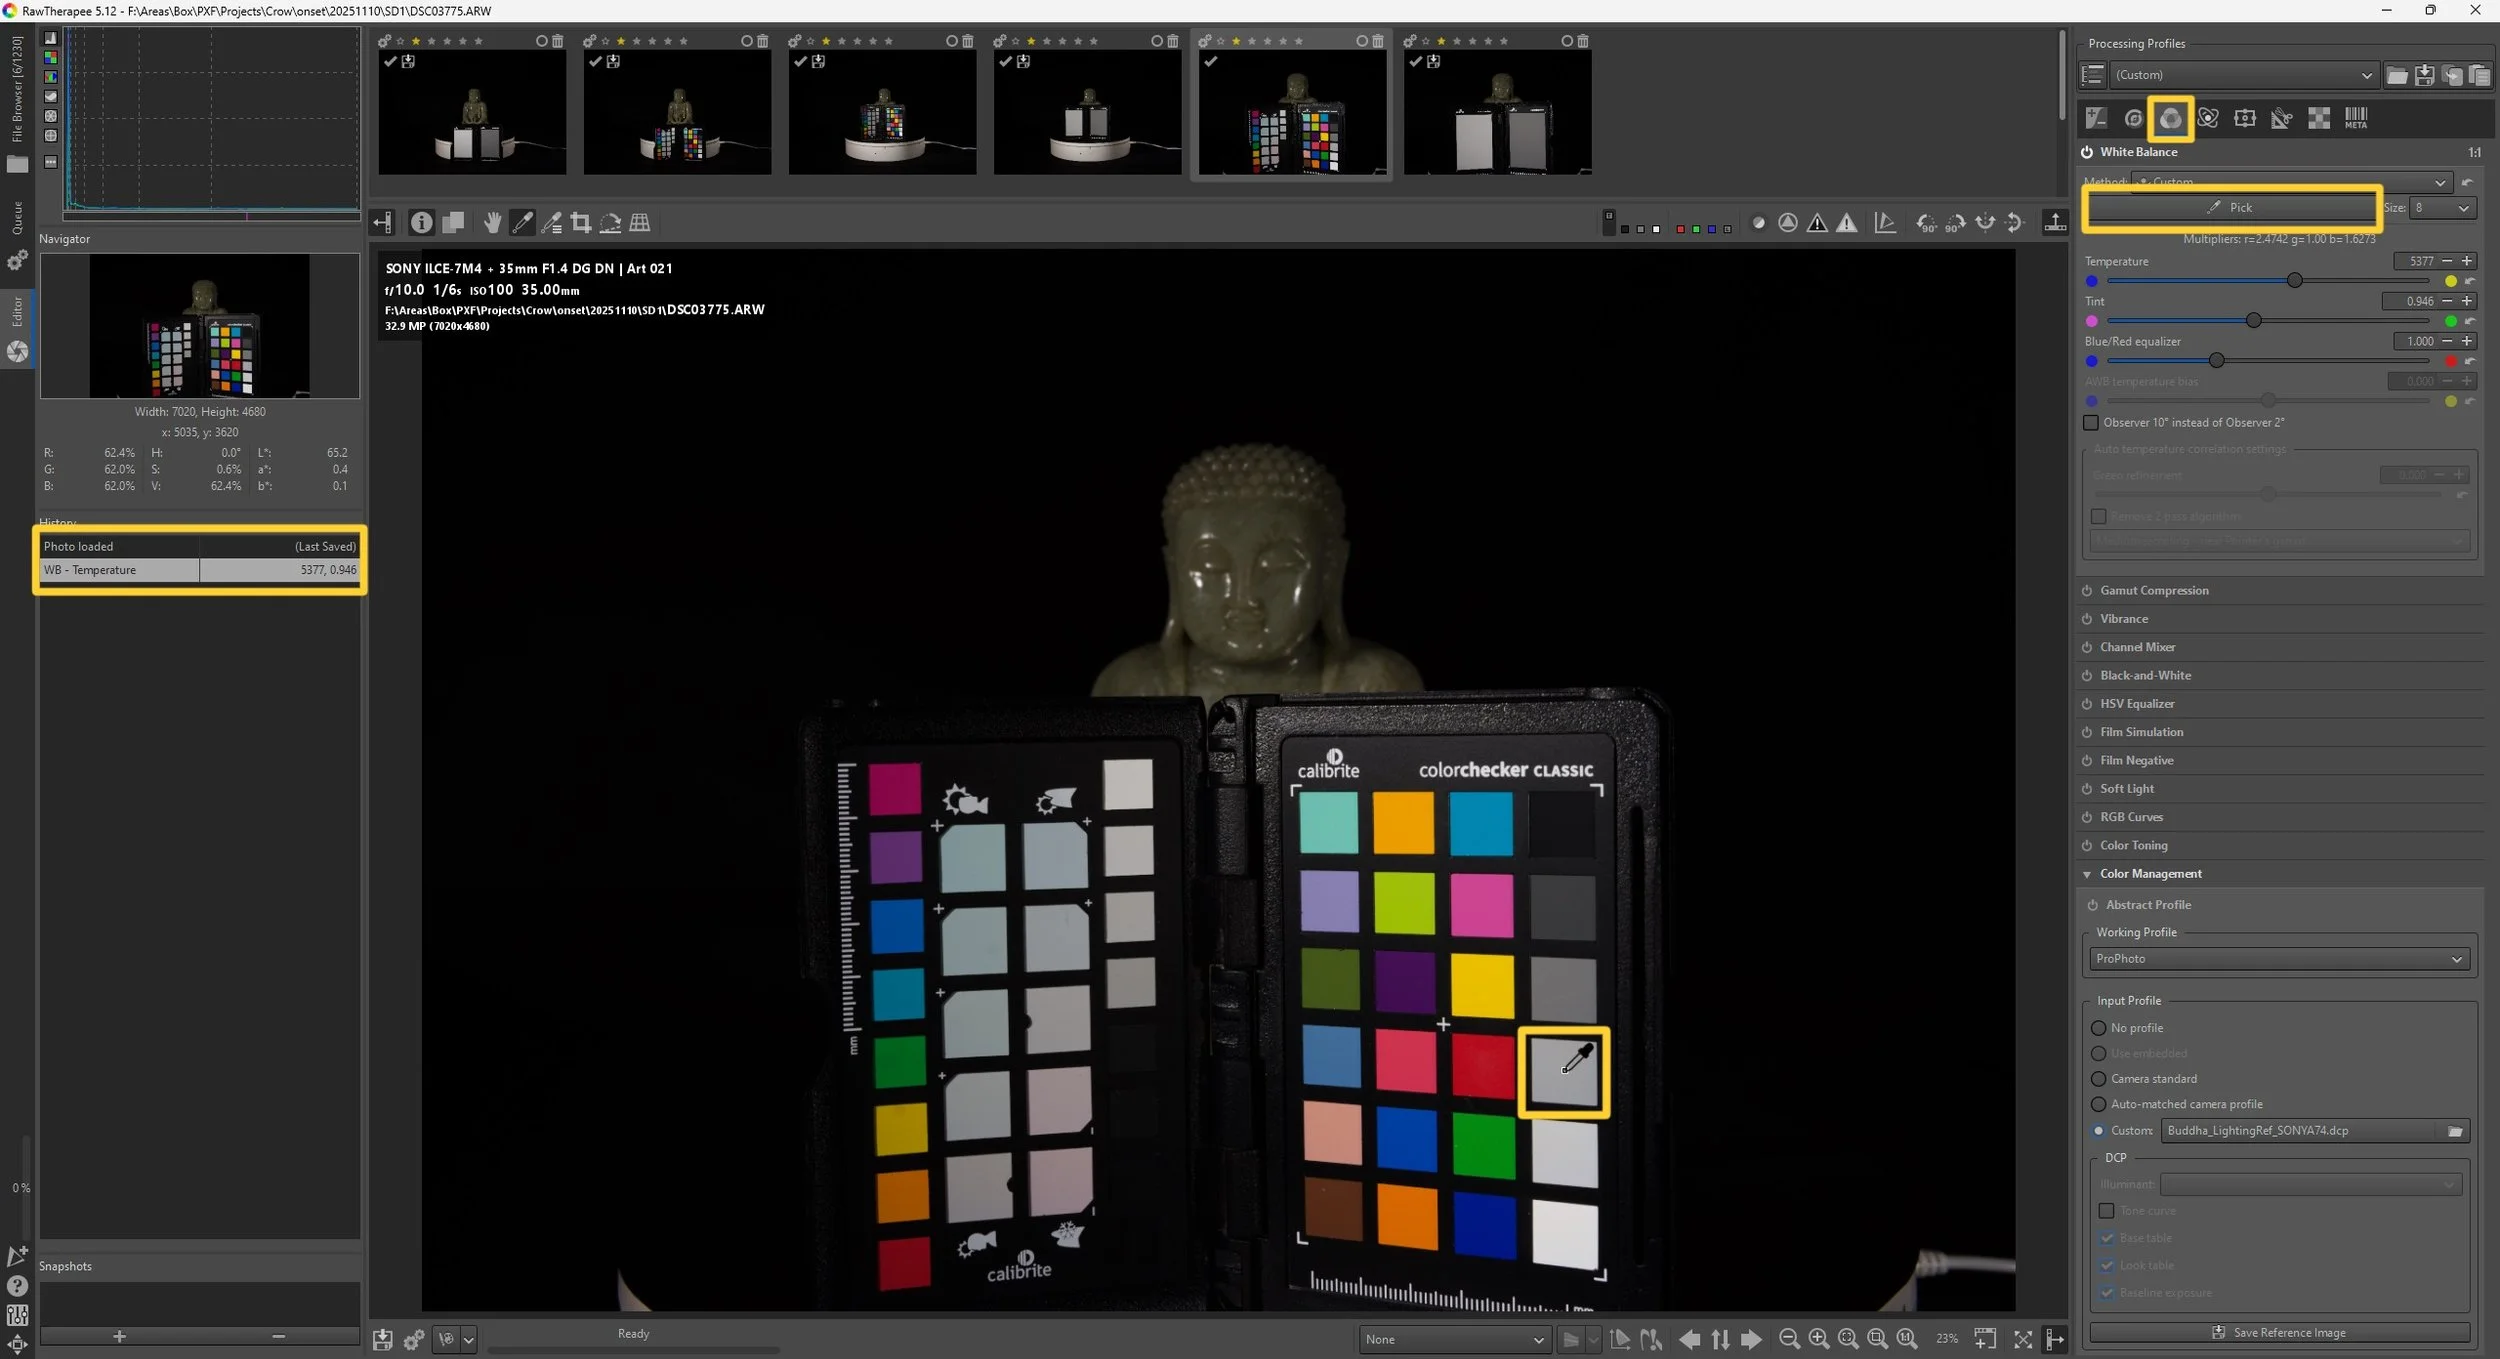
III. White Balancing Using Macbeth Chart
Selecting Reference Image
When selecting a ColorChecker reference image, choose one where the chart is in sharp focus with no blur, no glare, and proper exposure so that all color patches are clearly visible. Avoid using images with blown highlights, motion blur, or an angled chart photograph, as these issues can distort the color readings and reduce the accuracy of the calibration.
White Balancing
Open Color Checker image in RawTherapee Editor.
Carry out the following steps for:
Rank 1 — Lighting reference Macbeth ColorChecker
Rank 3 — Cross-polarized & Parallel ColorCheckers
Steps:
Navigate to:
Processing Panel: Color Tab → White Balance
Click Pick tool.
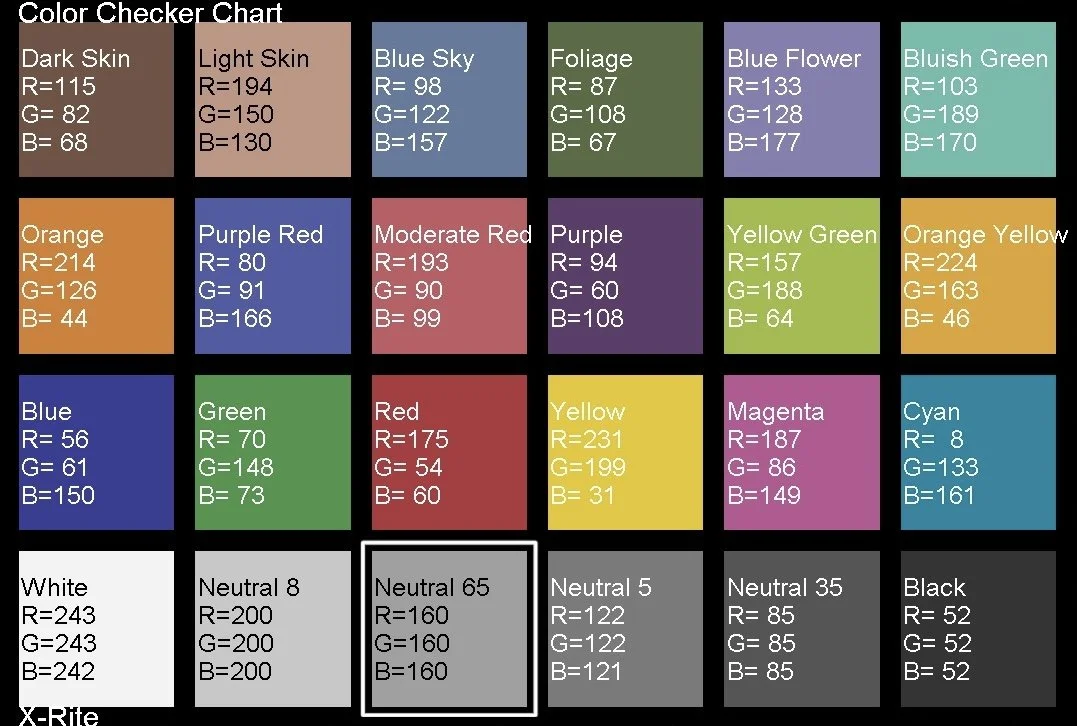
Pick a neutral grey square on ColorChecker - Neutral 65 (RGB: 160,160,160)
Carry out and repeat this step for:
Rank 1 — Lighting reference Macbeth ColorChecker
Rank 3 — Cross-polarized & Parallel ColorCheckers
Steps:
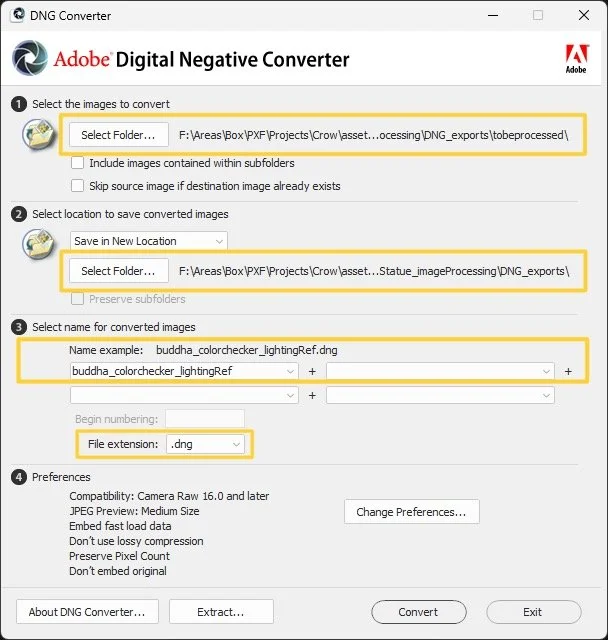
To convert the RAW images to DNG, open the Adobe DNG Converter and select the folder containing the RAW files from the scanning session, including the Macbeth ColorChecker images for the lighting reference, cross-polarized setup, and parallel-polarized setup.
Set the output destination to the DNG_exports folder and run the conversion so these files can be used for camera calibration.
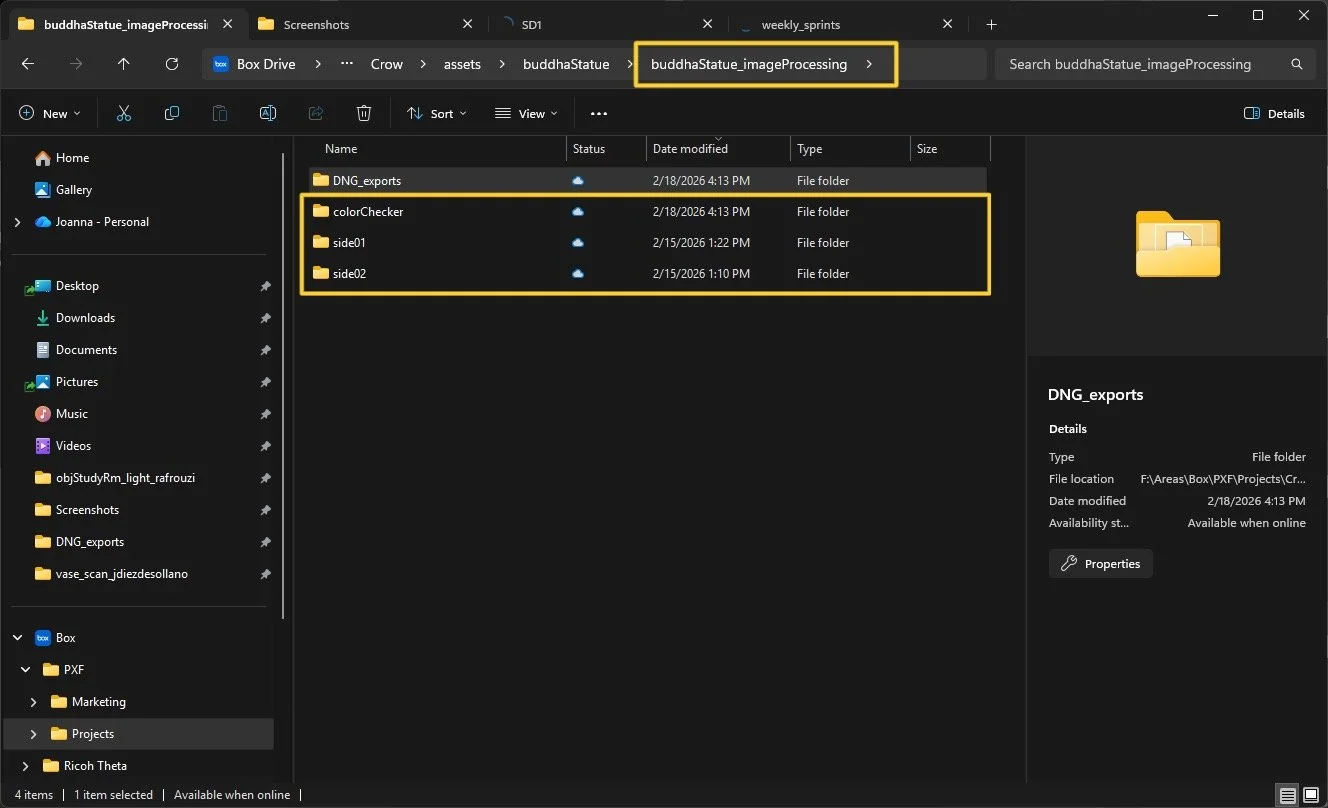
After completing the conversion, the DNG_exports folder should contain three key files:
DNG of lighting reference color checker - buddha_colorchecker_lightingRef.dng
DNG of cross-polarized color checker - buddha_colorchecker_xpol.dng
DNG of parallel-polarized color checker - buddha_colorchecker_ppol.dng
IV. Converting RAW to DNG
Why Convert RAW → DNG for Calibration
Converting raw photo scans or proprietary RAW files to Digital Negative (DNG) before camera calibration ensures a standardized, universally readable format, enhancing compatibility with various software and future-proofing files.
DNG preserves all raw, lossless image data (stores EXIF and color data and embeds calibration information), reduces file sizes, and consolidates metadata, eliminating the need for separate sidecar (XMP) files. Tools like calibration software often expect linear RAW-equivalent input; DNG guarantees this.
To convert the RAW images to DNG, open the Adobe DNG Converter and select the folder containing the RAW files from the scanning session, including the Macbeth ColorChecker images for the lighting reference, cross-polarized setup, and parallel-polarized setup. Set the output destination to the DNG_exports folder and run the conversion so these files can be used for camera calibration.
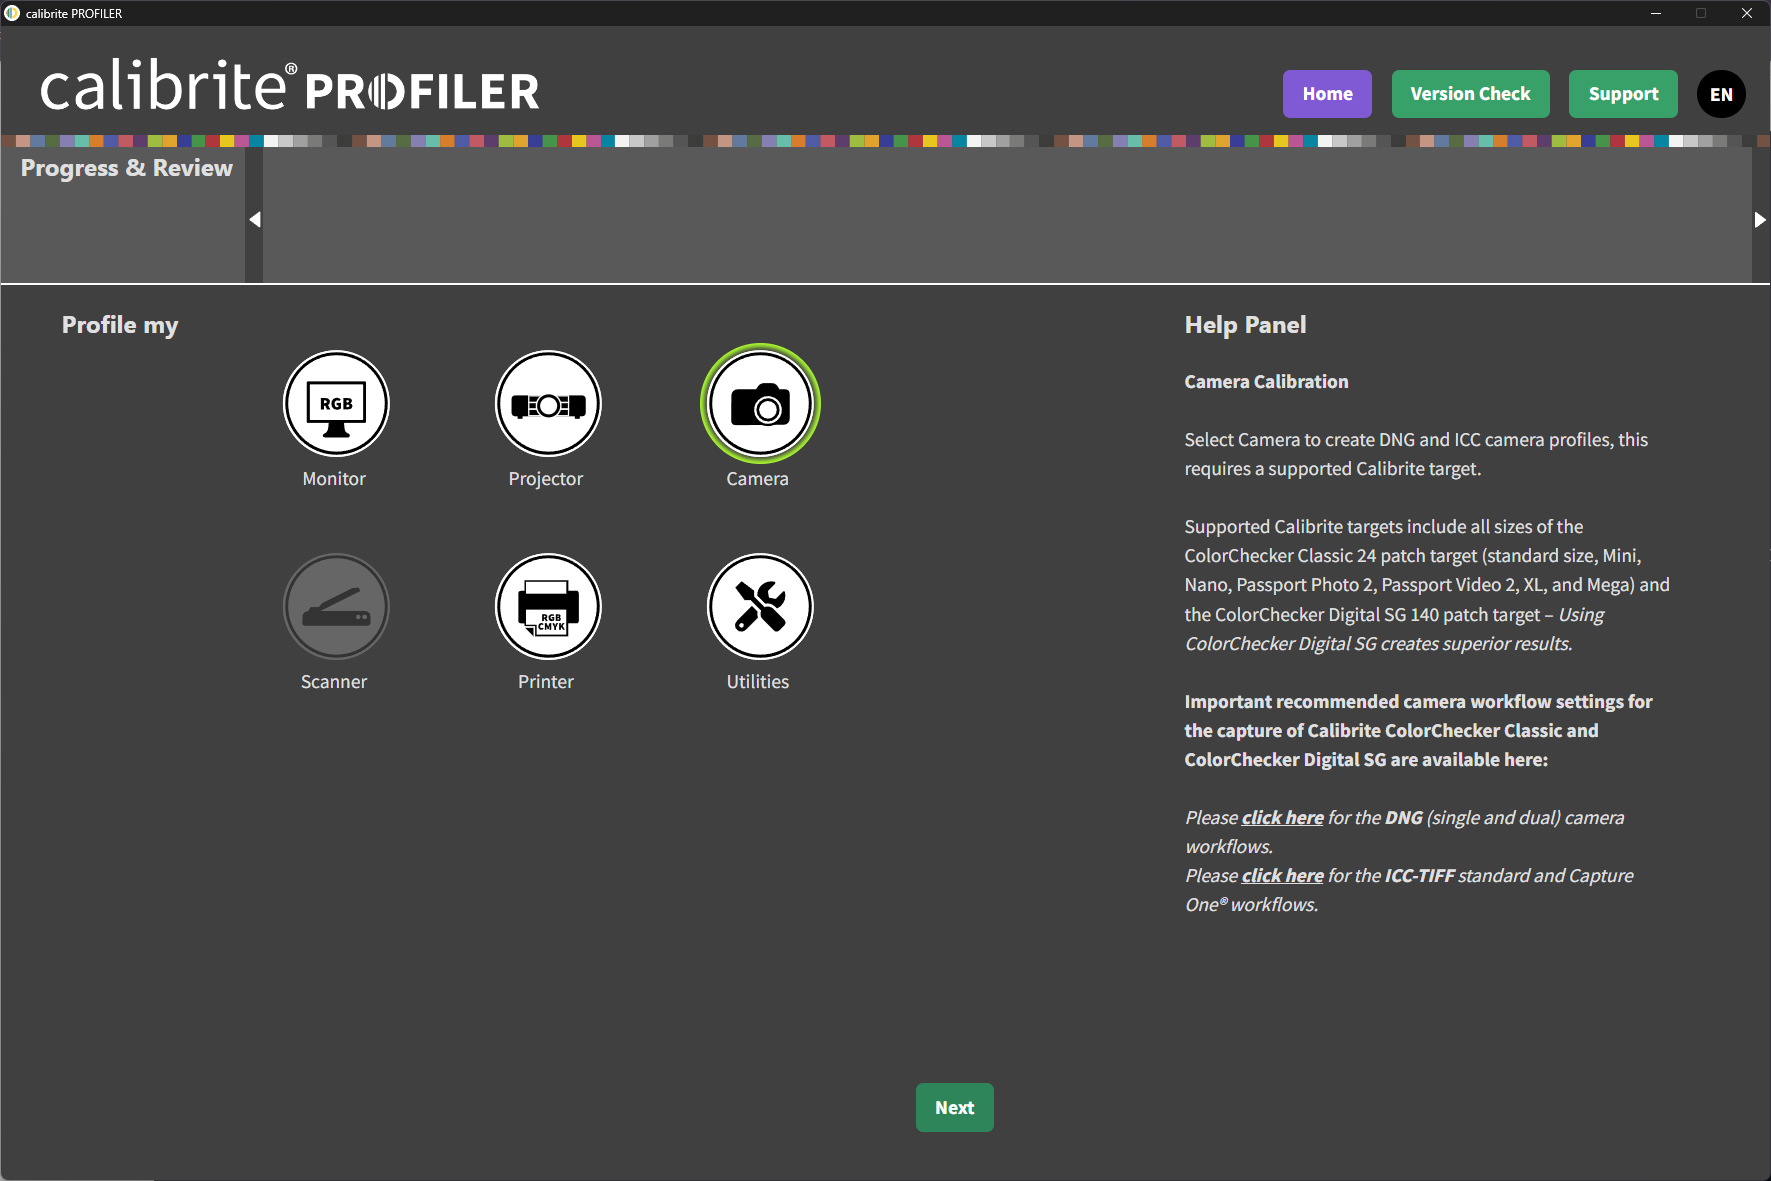
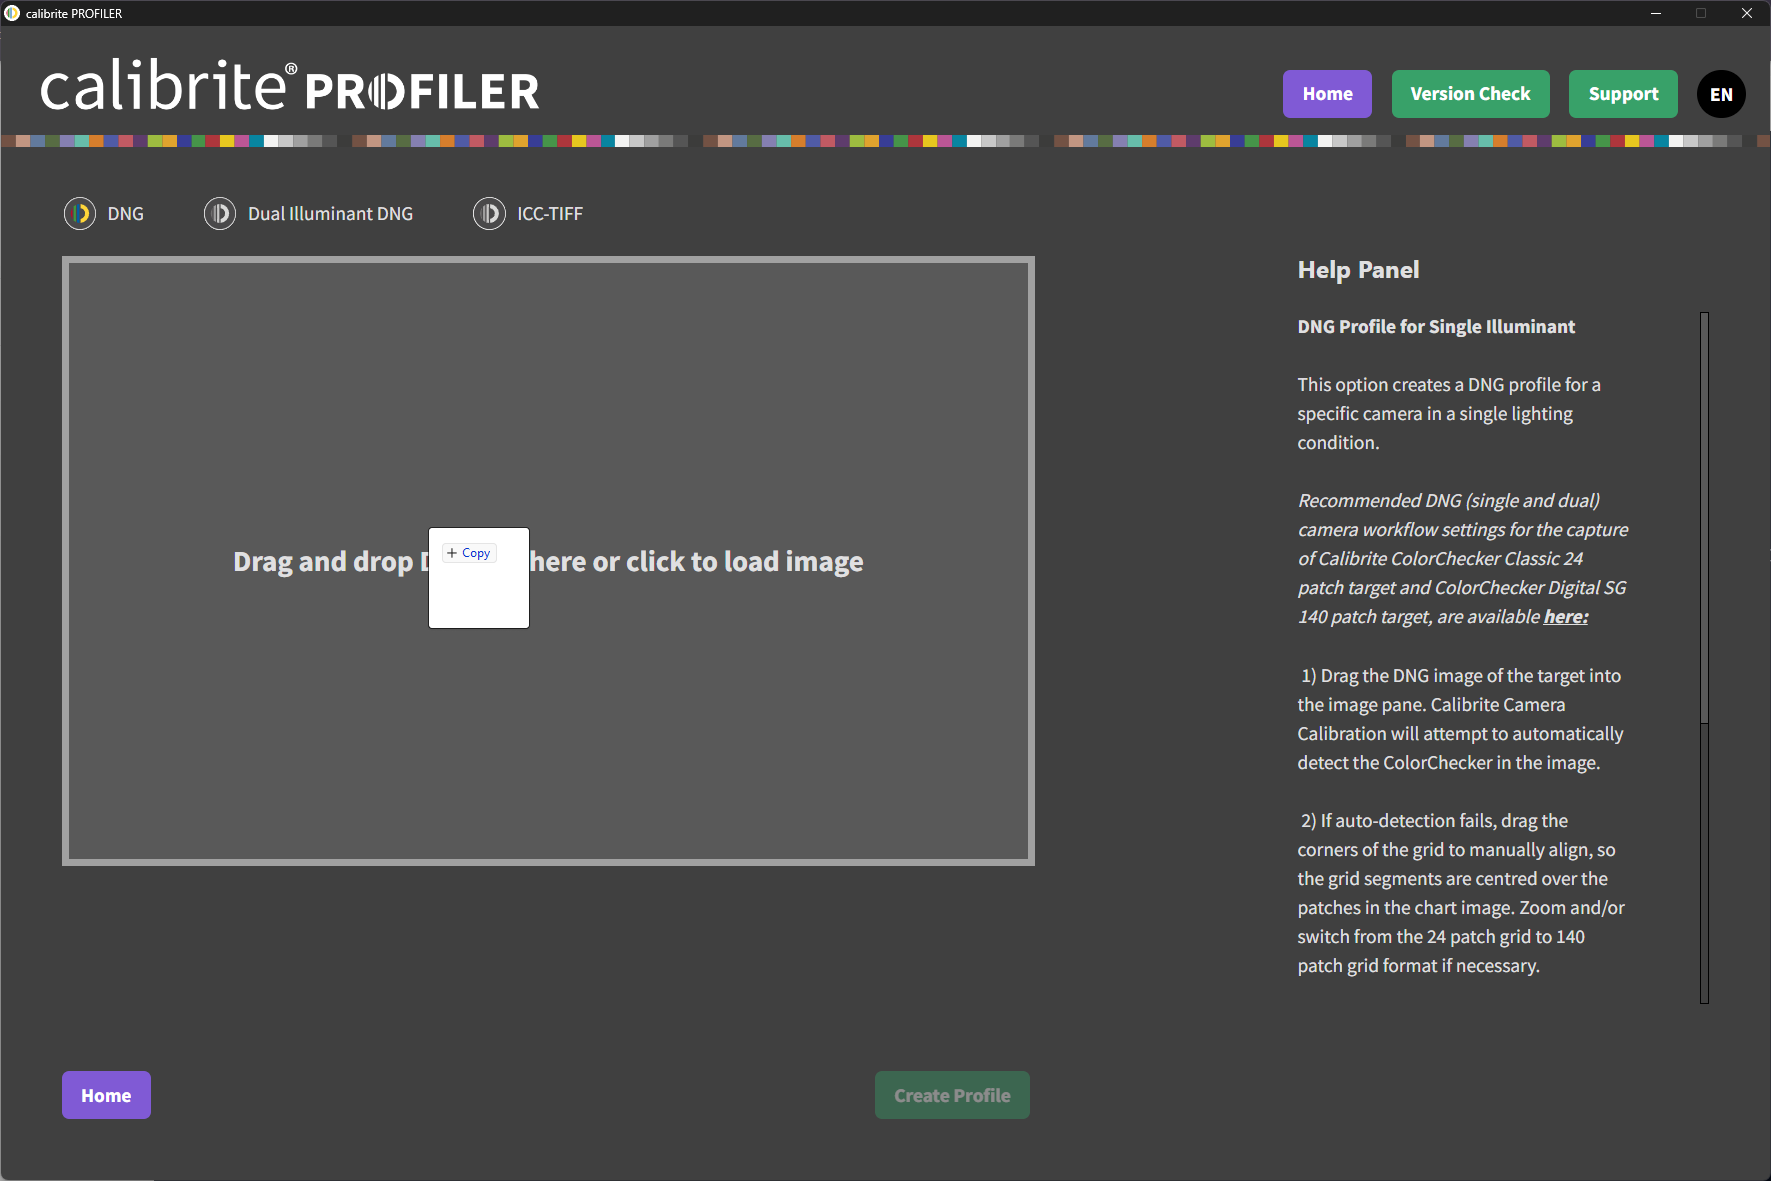
V. Camera Profile Calibration
Using Calibrite PROFILER
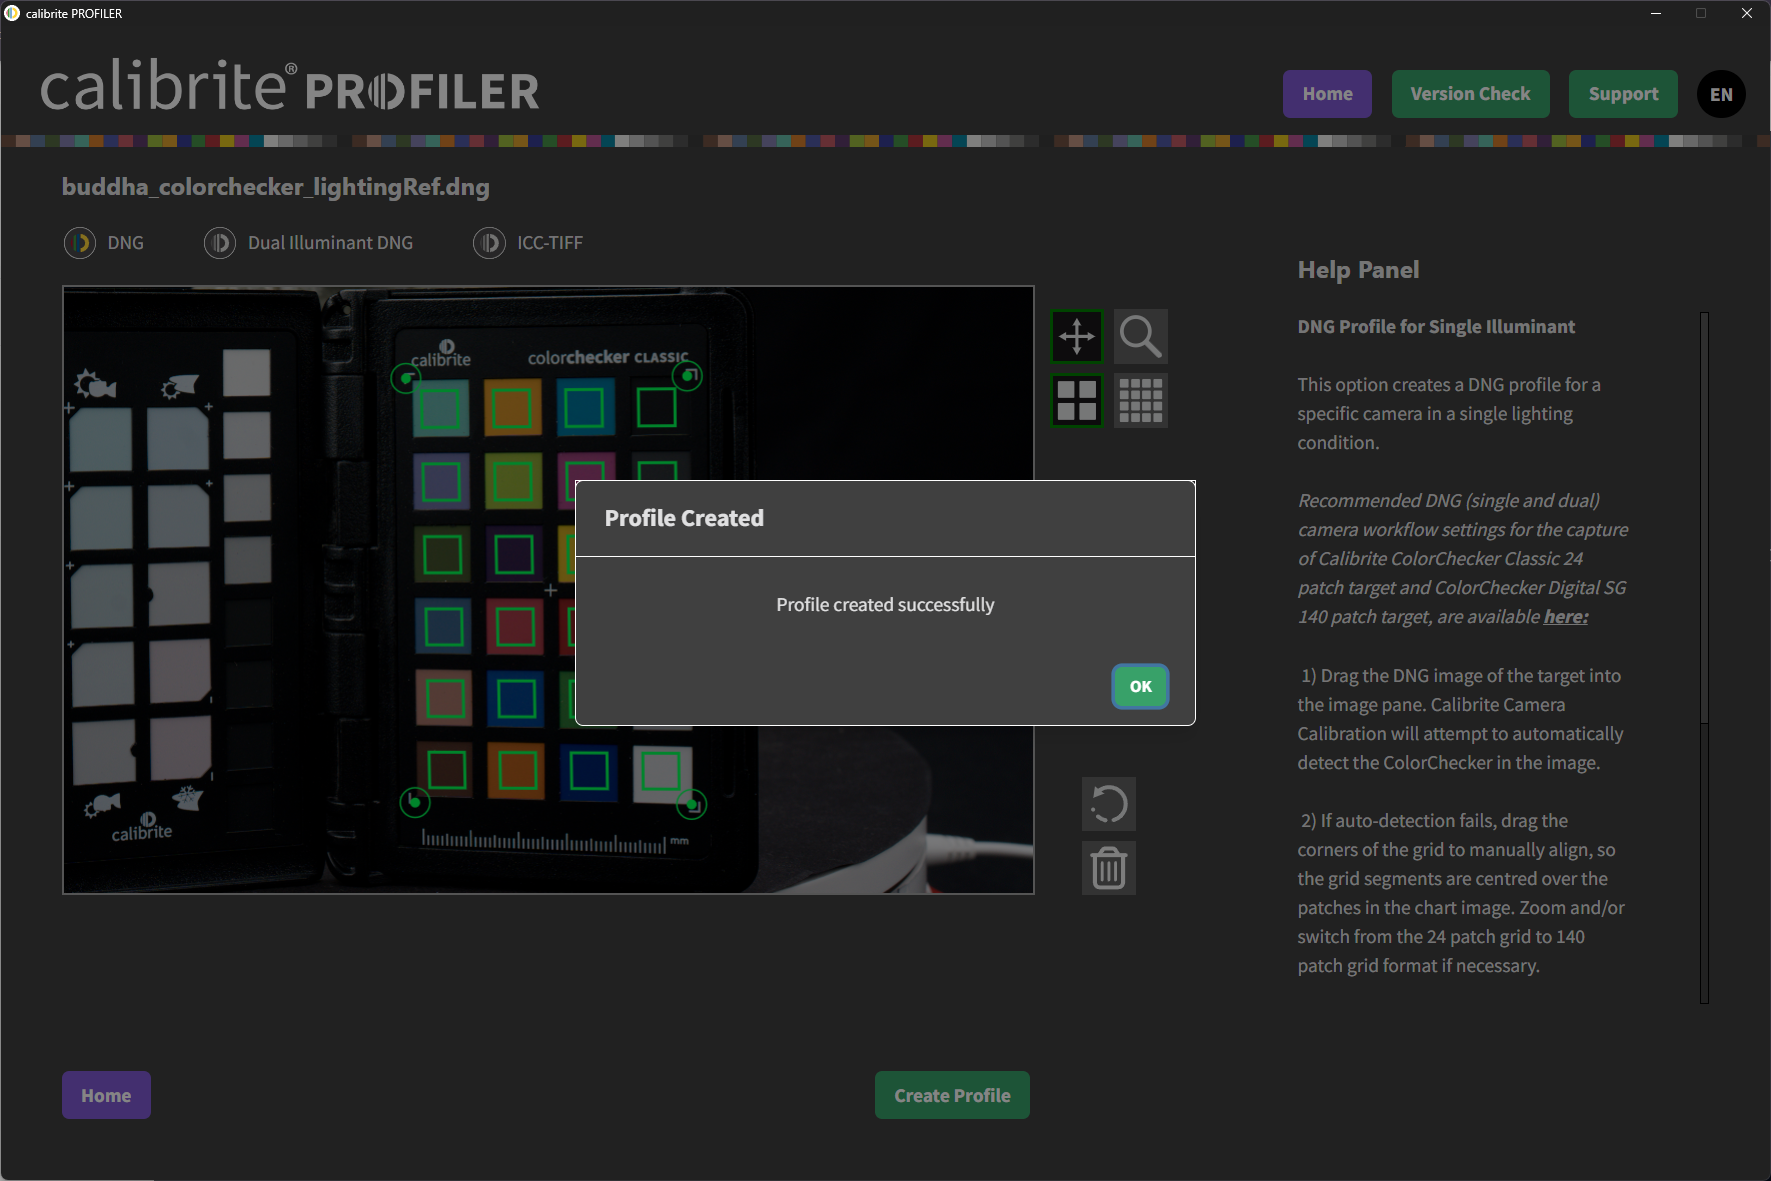
A. Calibrate and Create Camera profiles
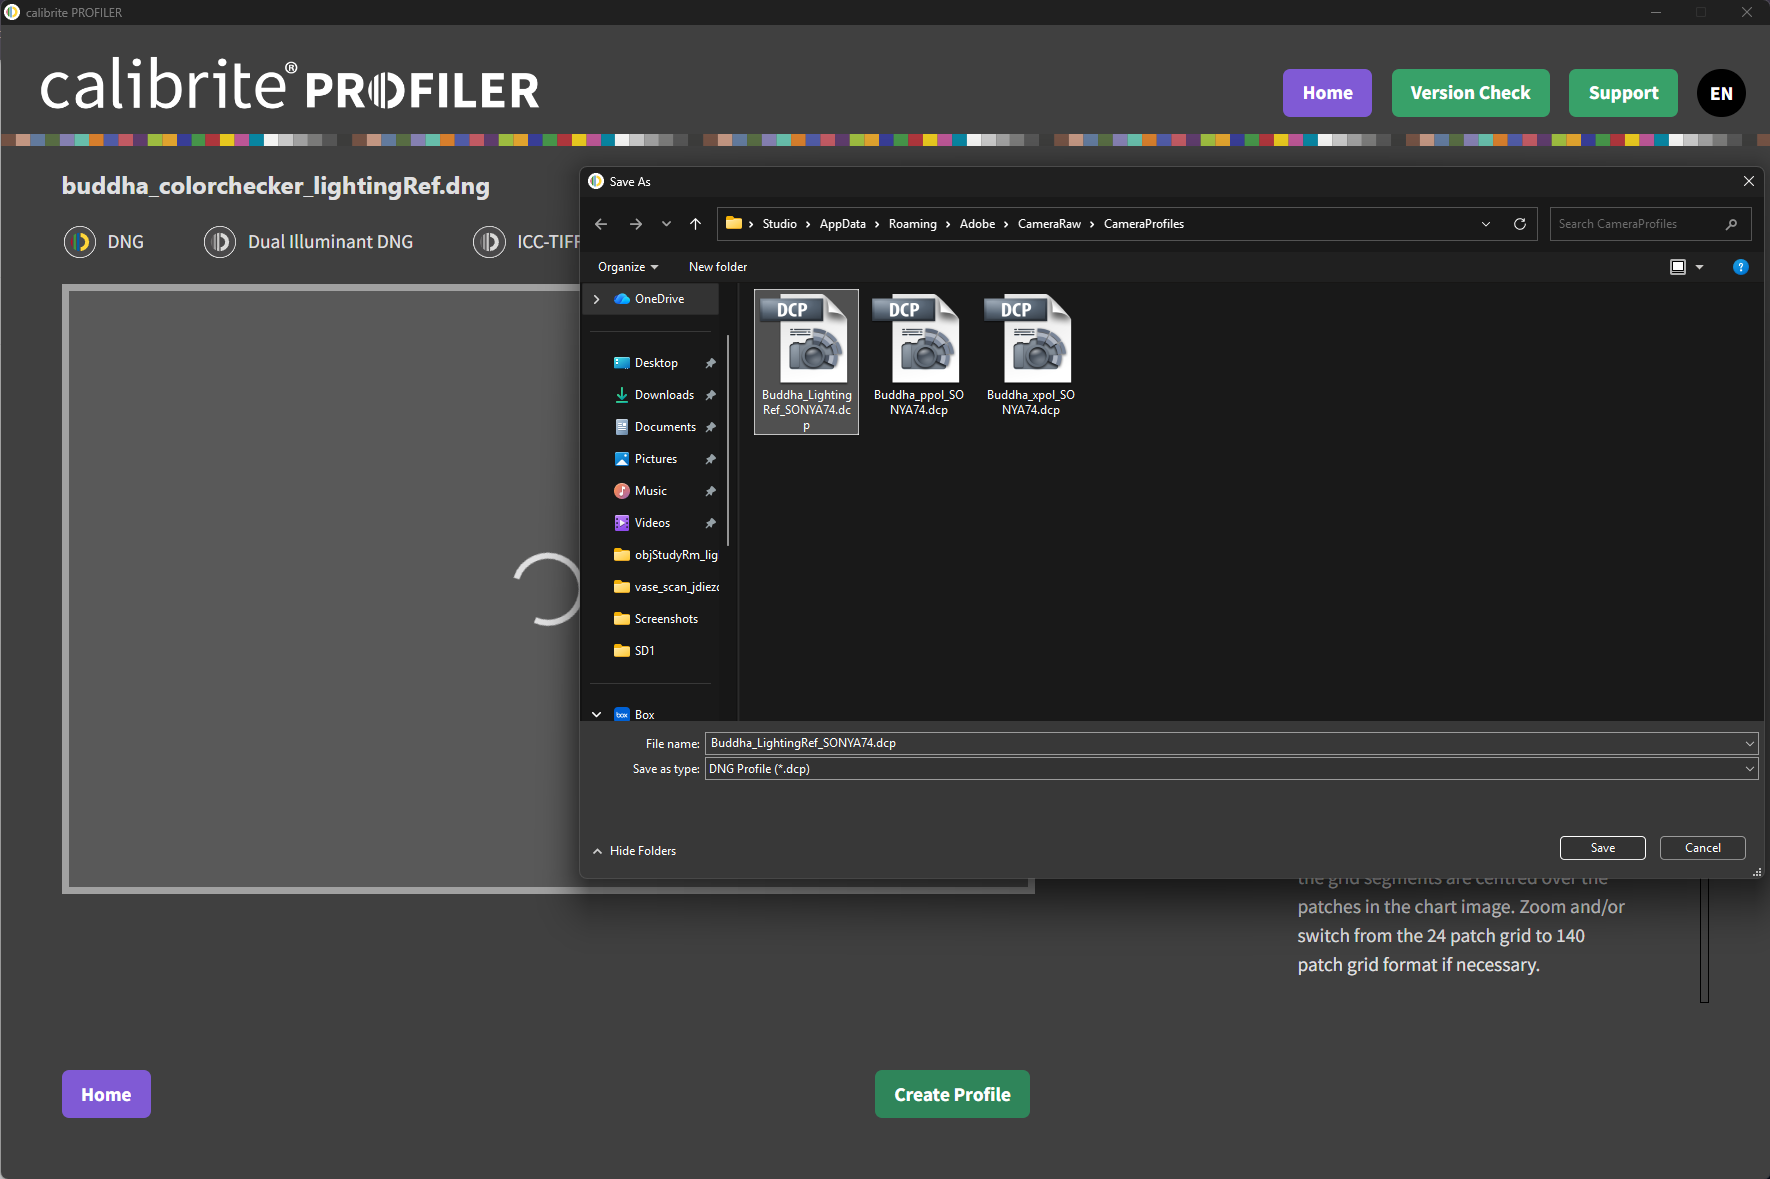
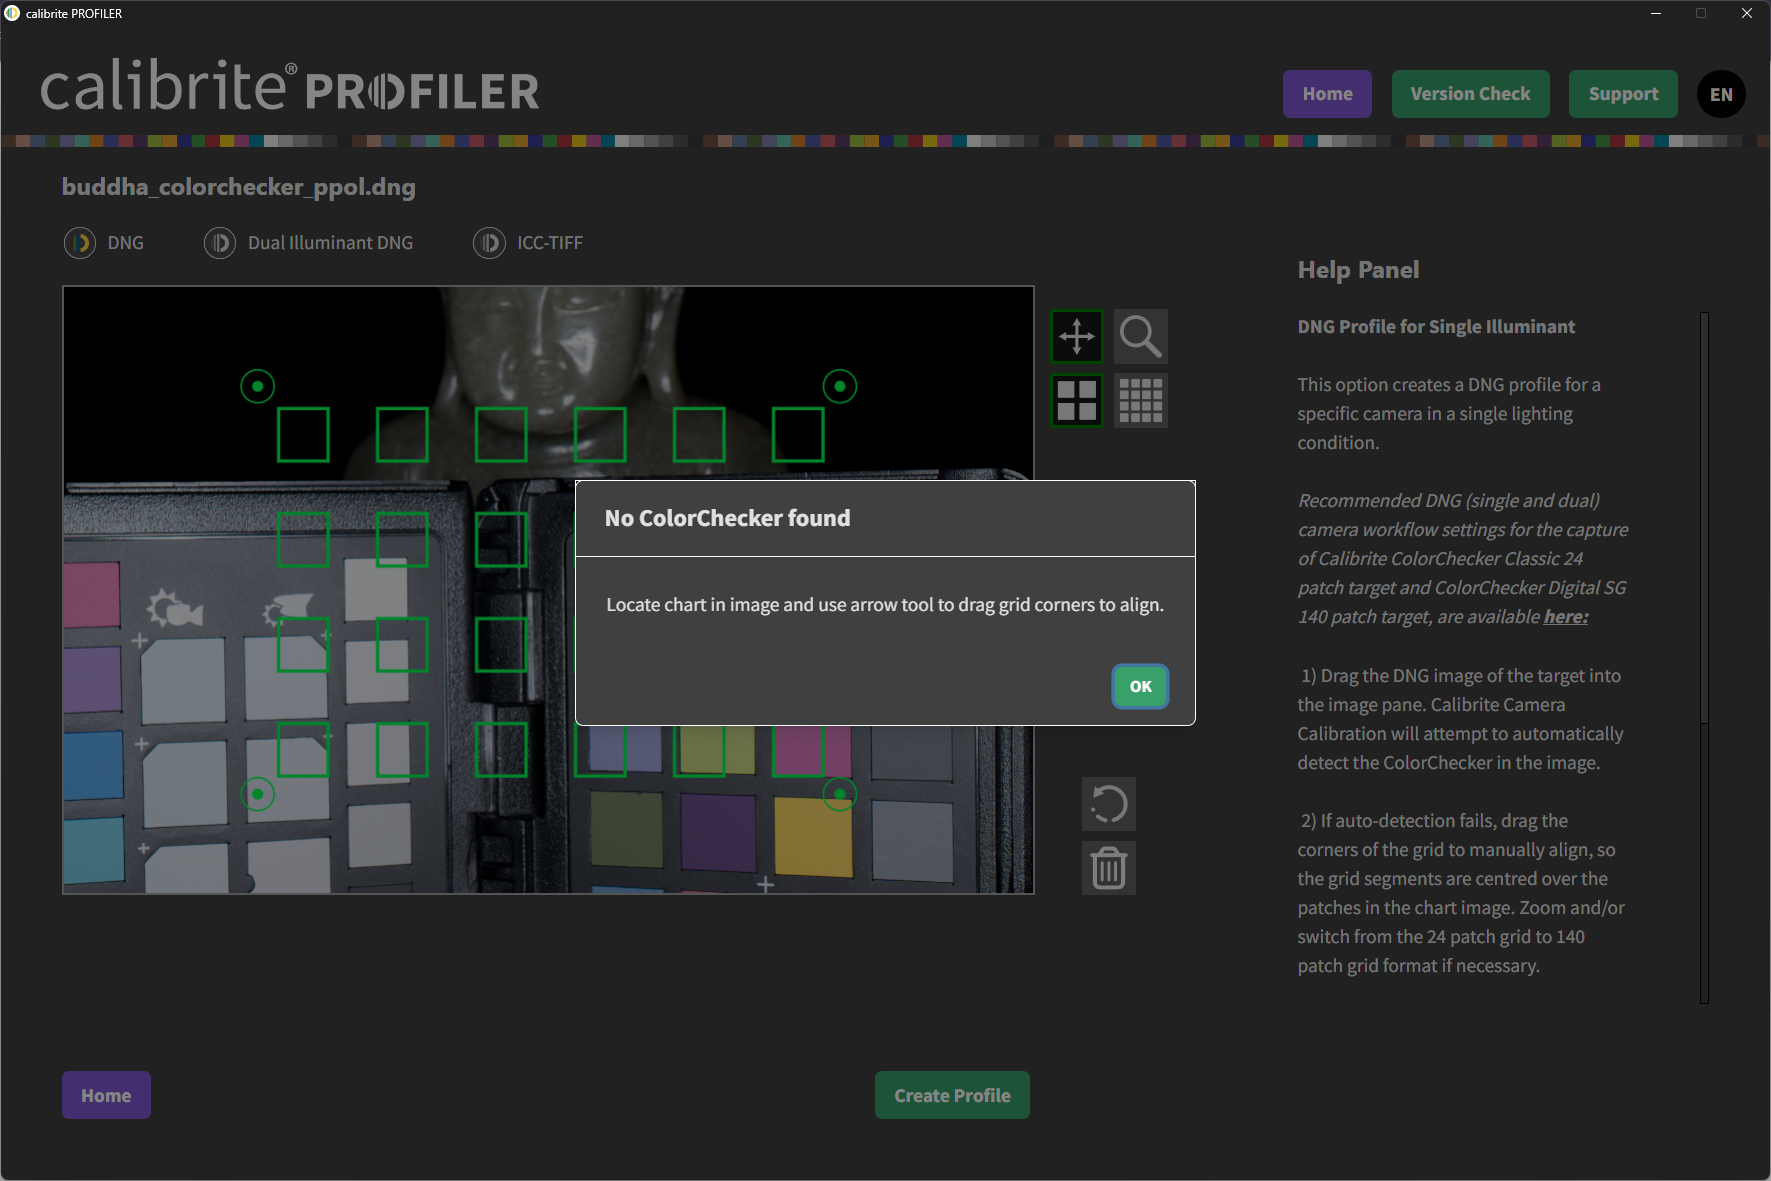
Load each Macbeth ColorChecker Chart DNG by drag and drop
Lighting referenceCross-polarizedParallel-polarizedEnsure chart detection works. If not, manually adjust corners
Then, create profile → Save
Camera Profile Naming Convention:
Lighting reference camera profile - assetName_LightingRef_SONYA74.icc Cross polarized camera profile - assetName_xpol_SONYA74.icc Parallel polarized camera profile - assetName_ppol_SONYA74.icc
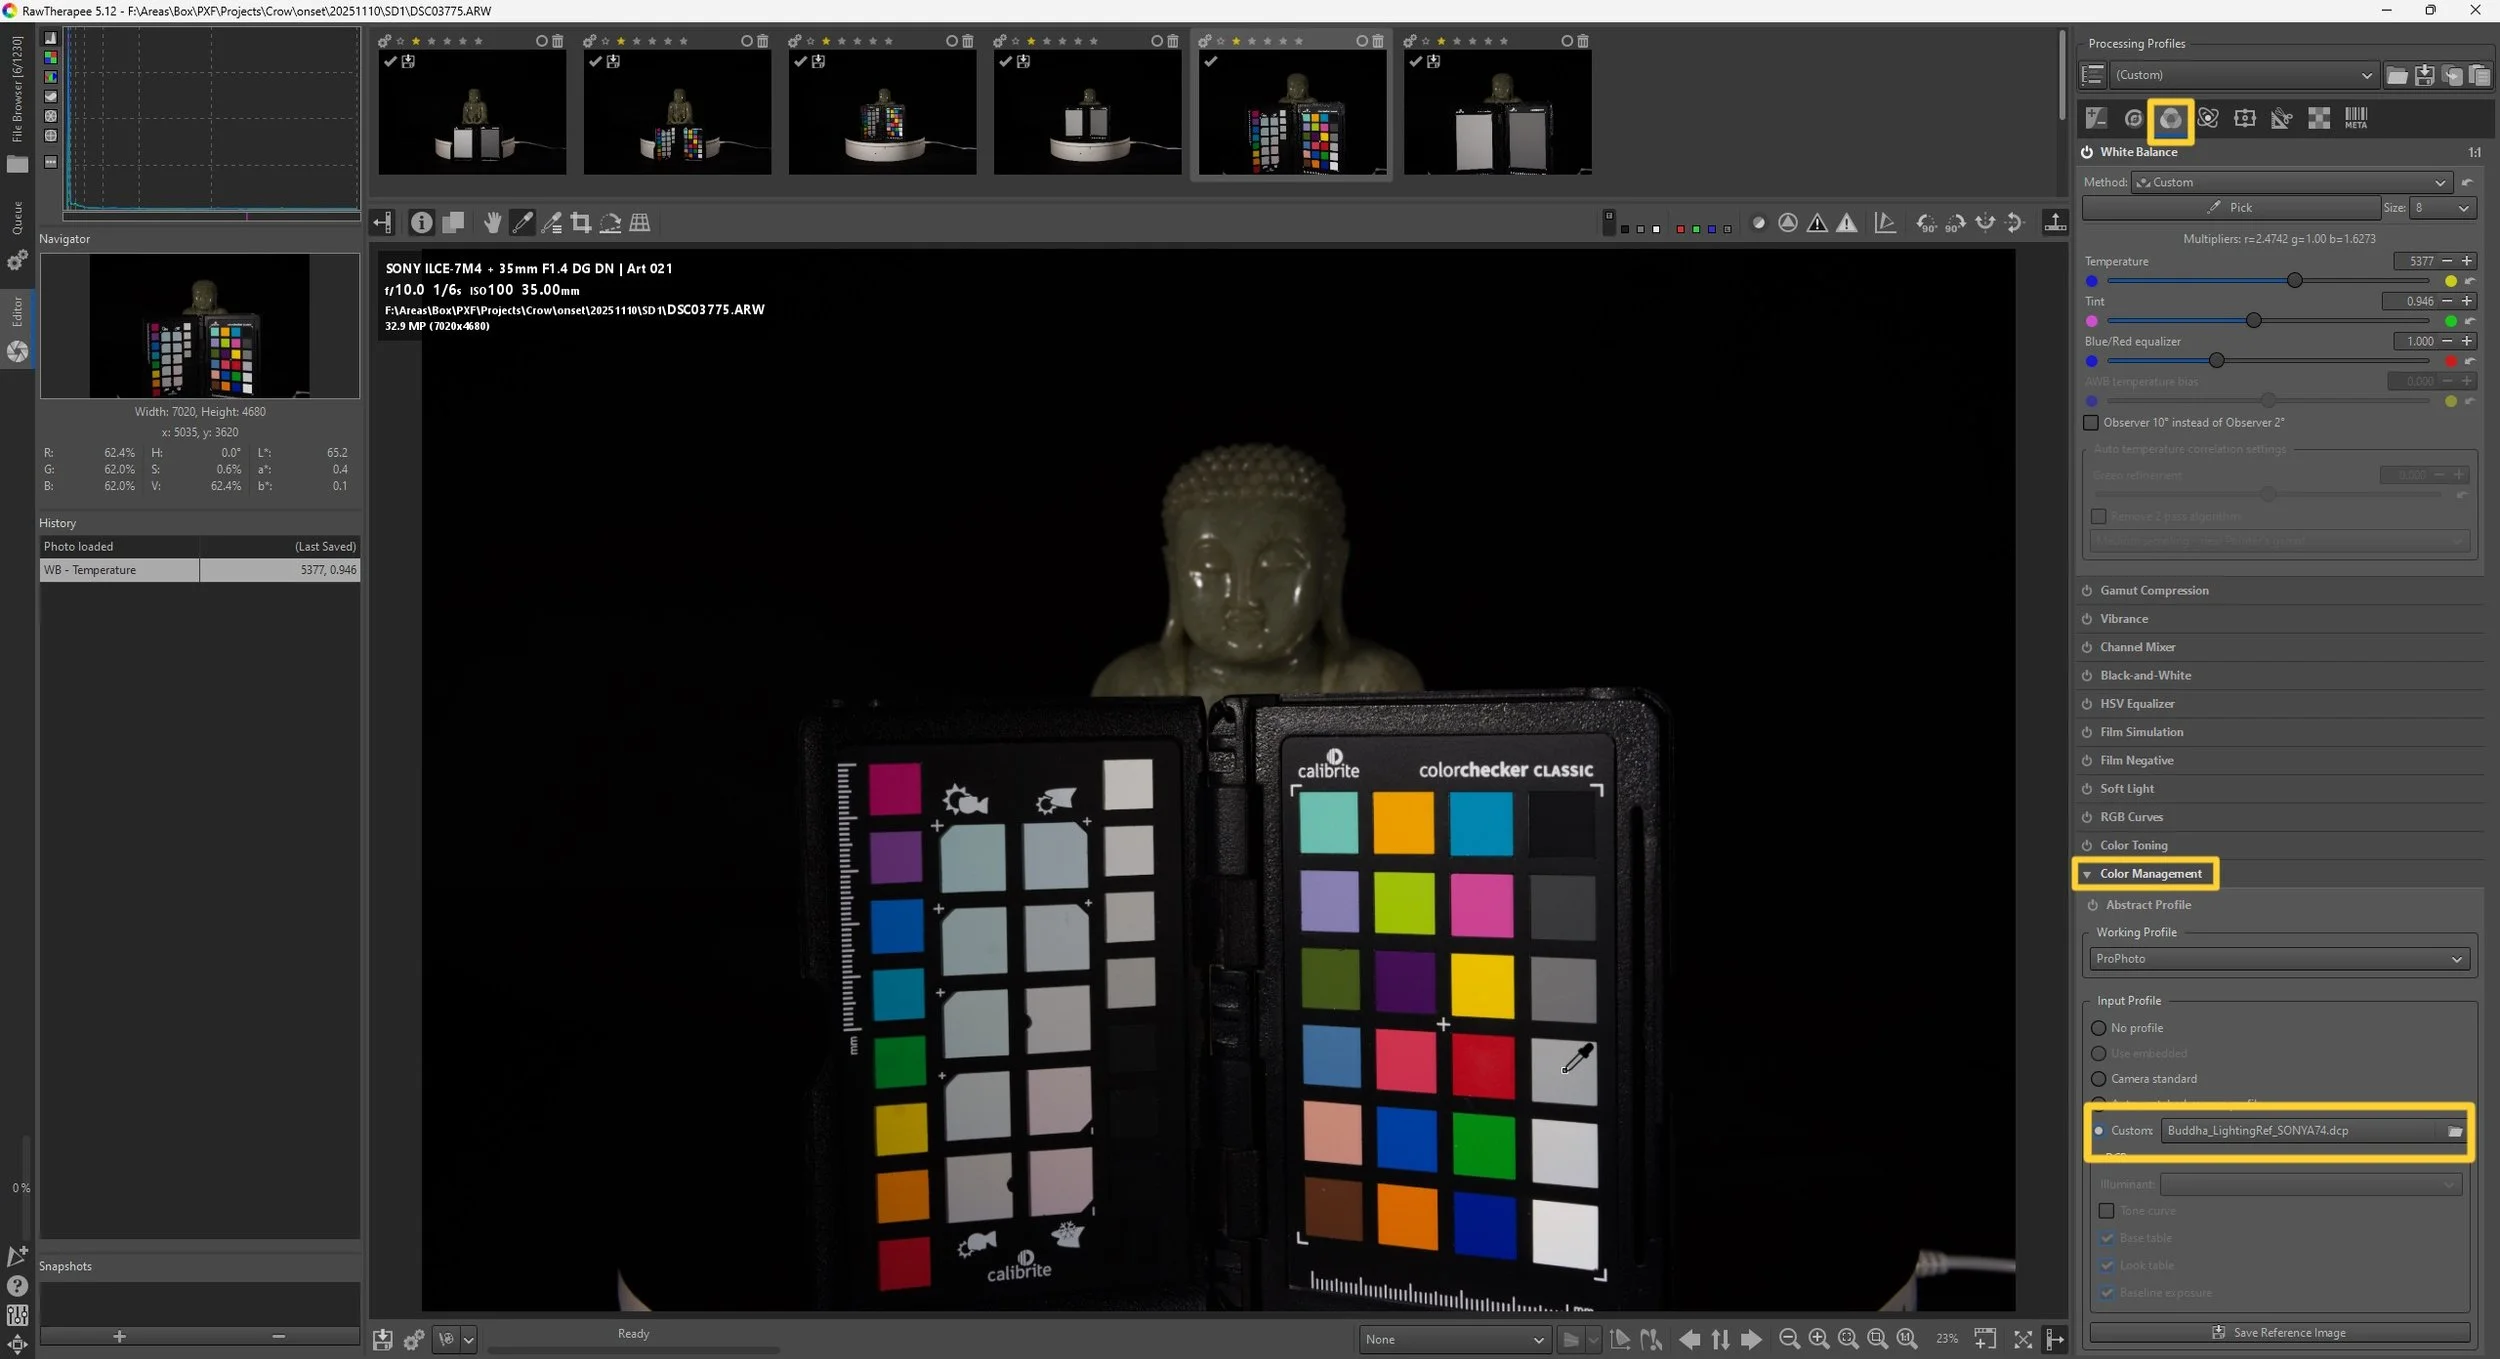
B. Applying Camera Profiles in RawTherapee
Navigate to:
Processing Panel: Color Tab → Color Management → Input Profile → Custom
Browse to file path where the camera profiles are saved and assign:
Lighting reference profile → Buddha_LightingRef_SONYA74.dcp
Cross polarized profile → Buddha_xpol_SONYA74.dcp
Parallel polarized profile → Buddha_ppol_SONYA74.dcp

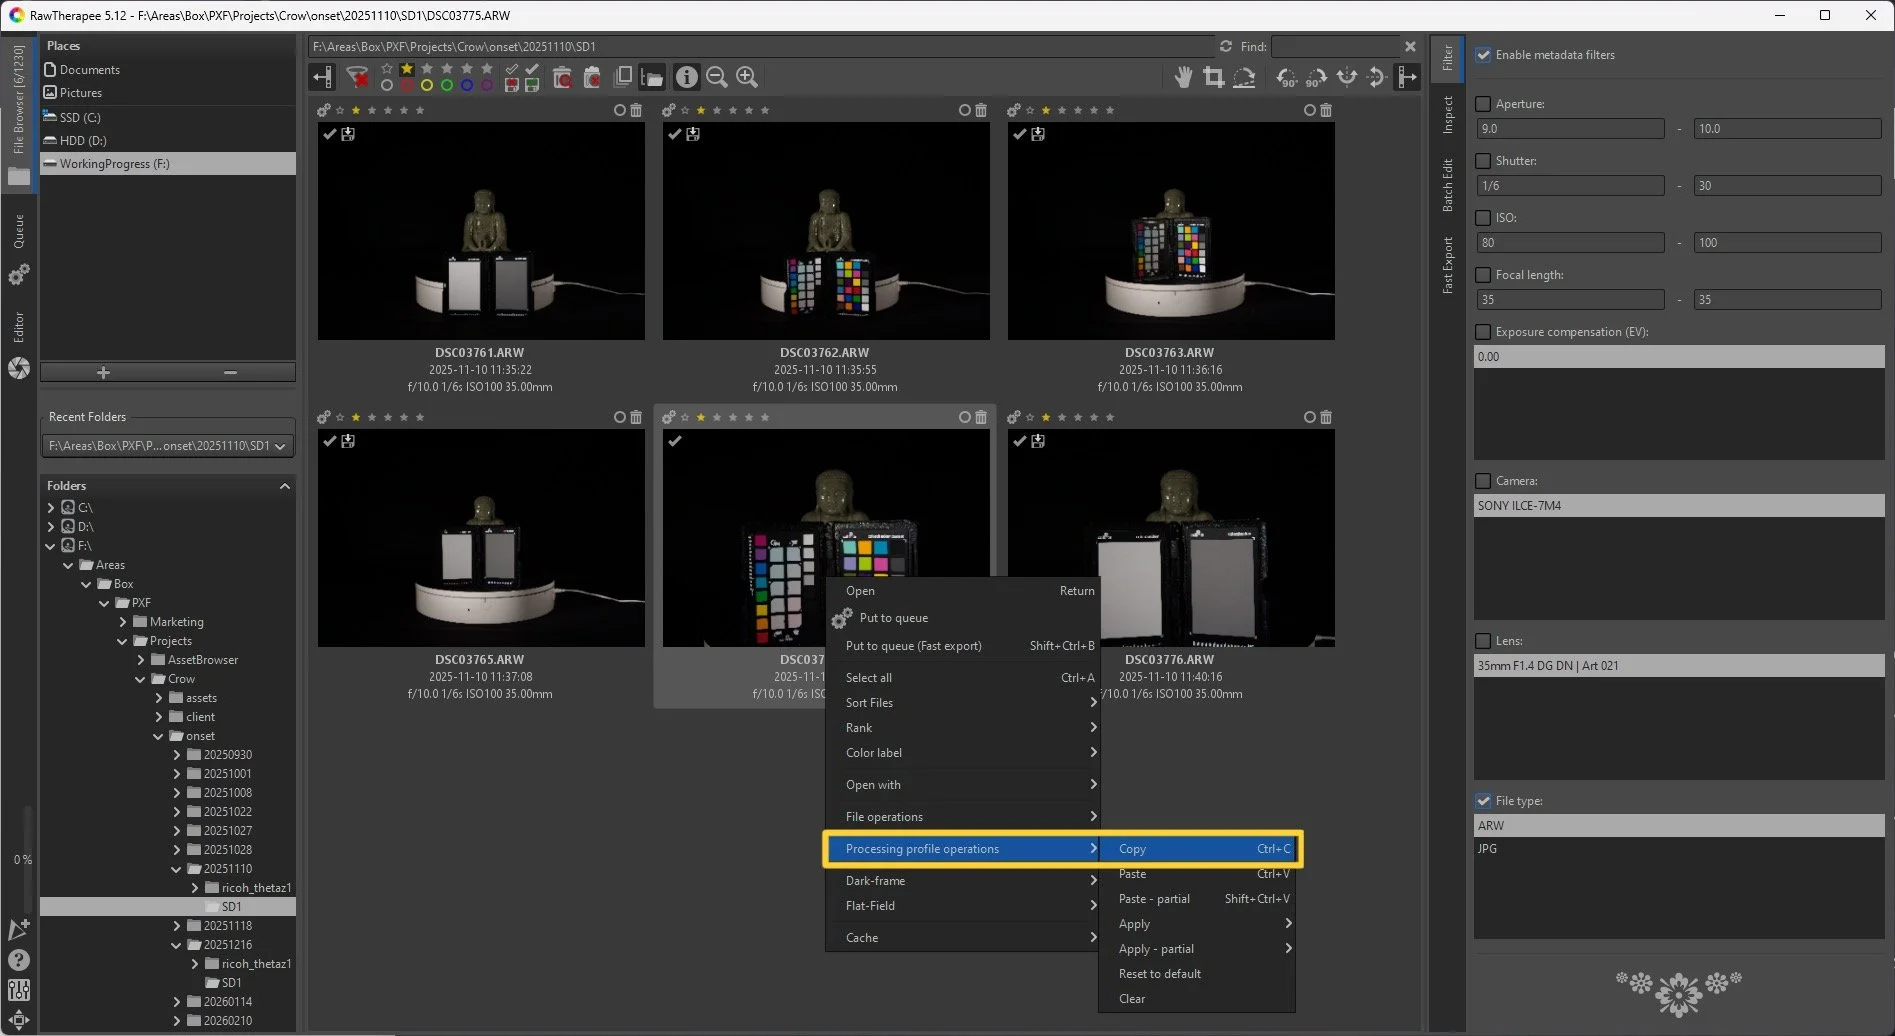
VI. Batch Adjustment Sync
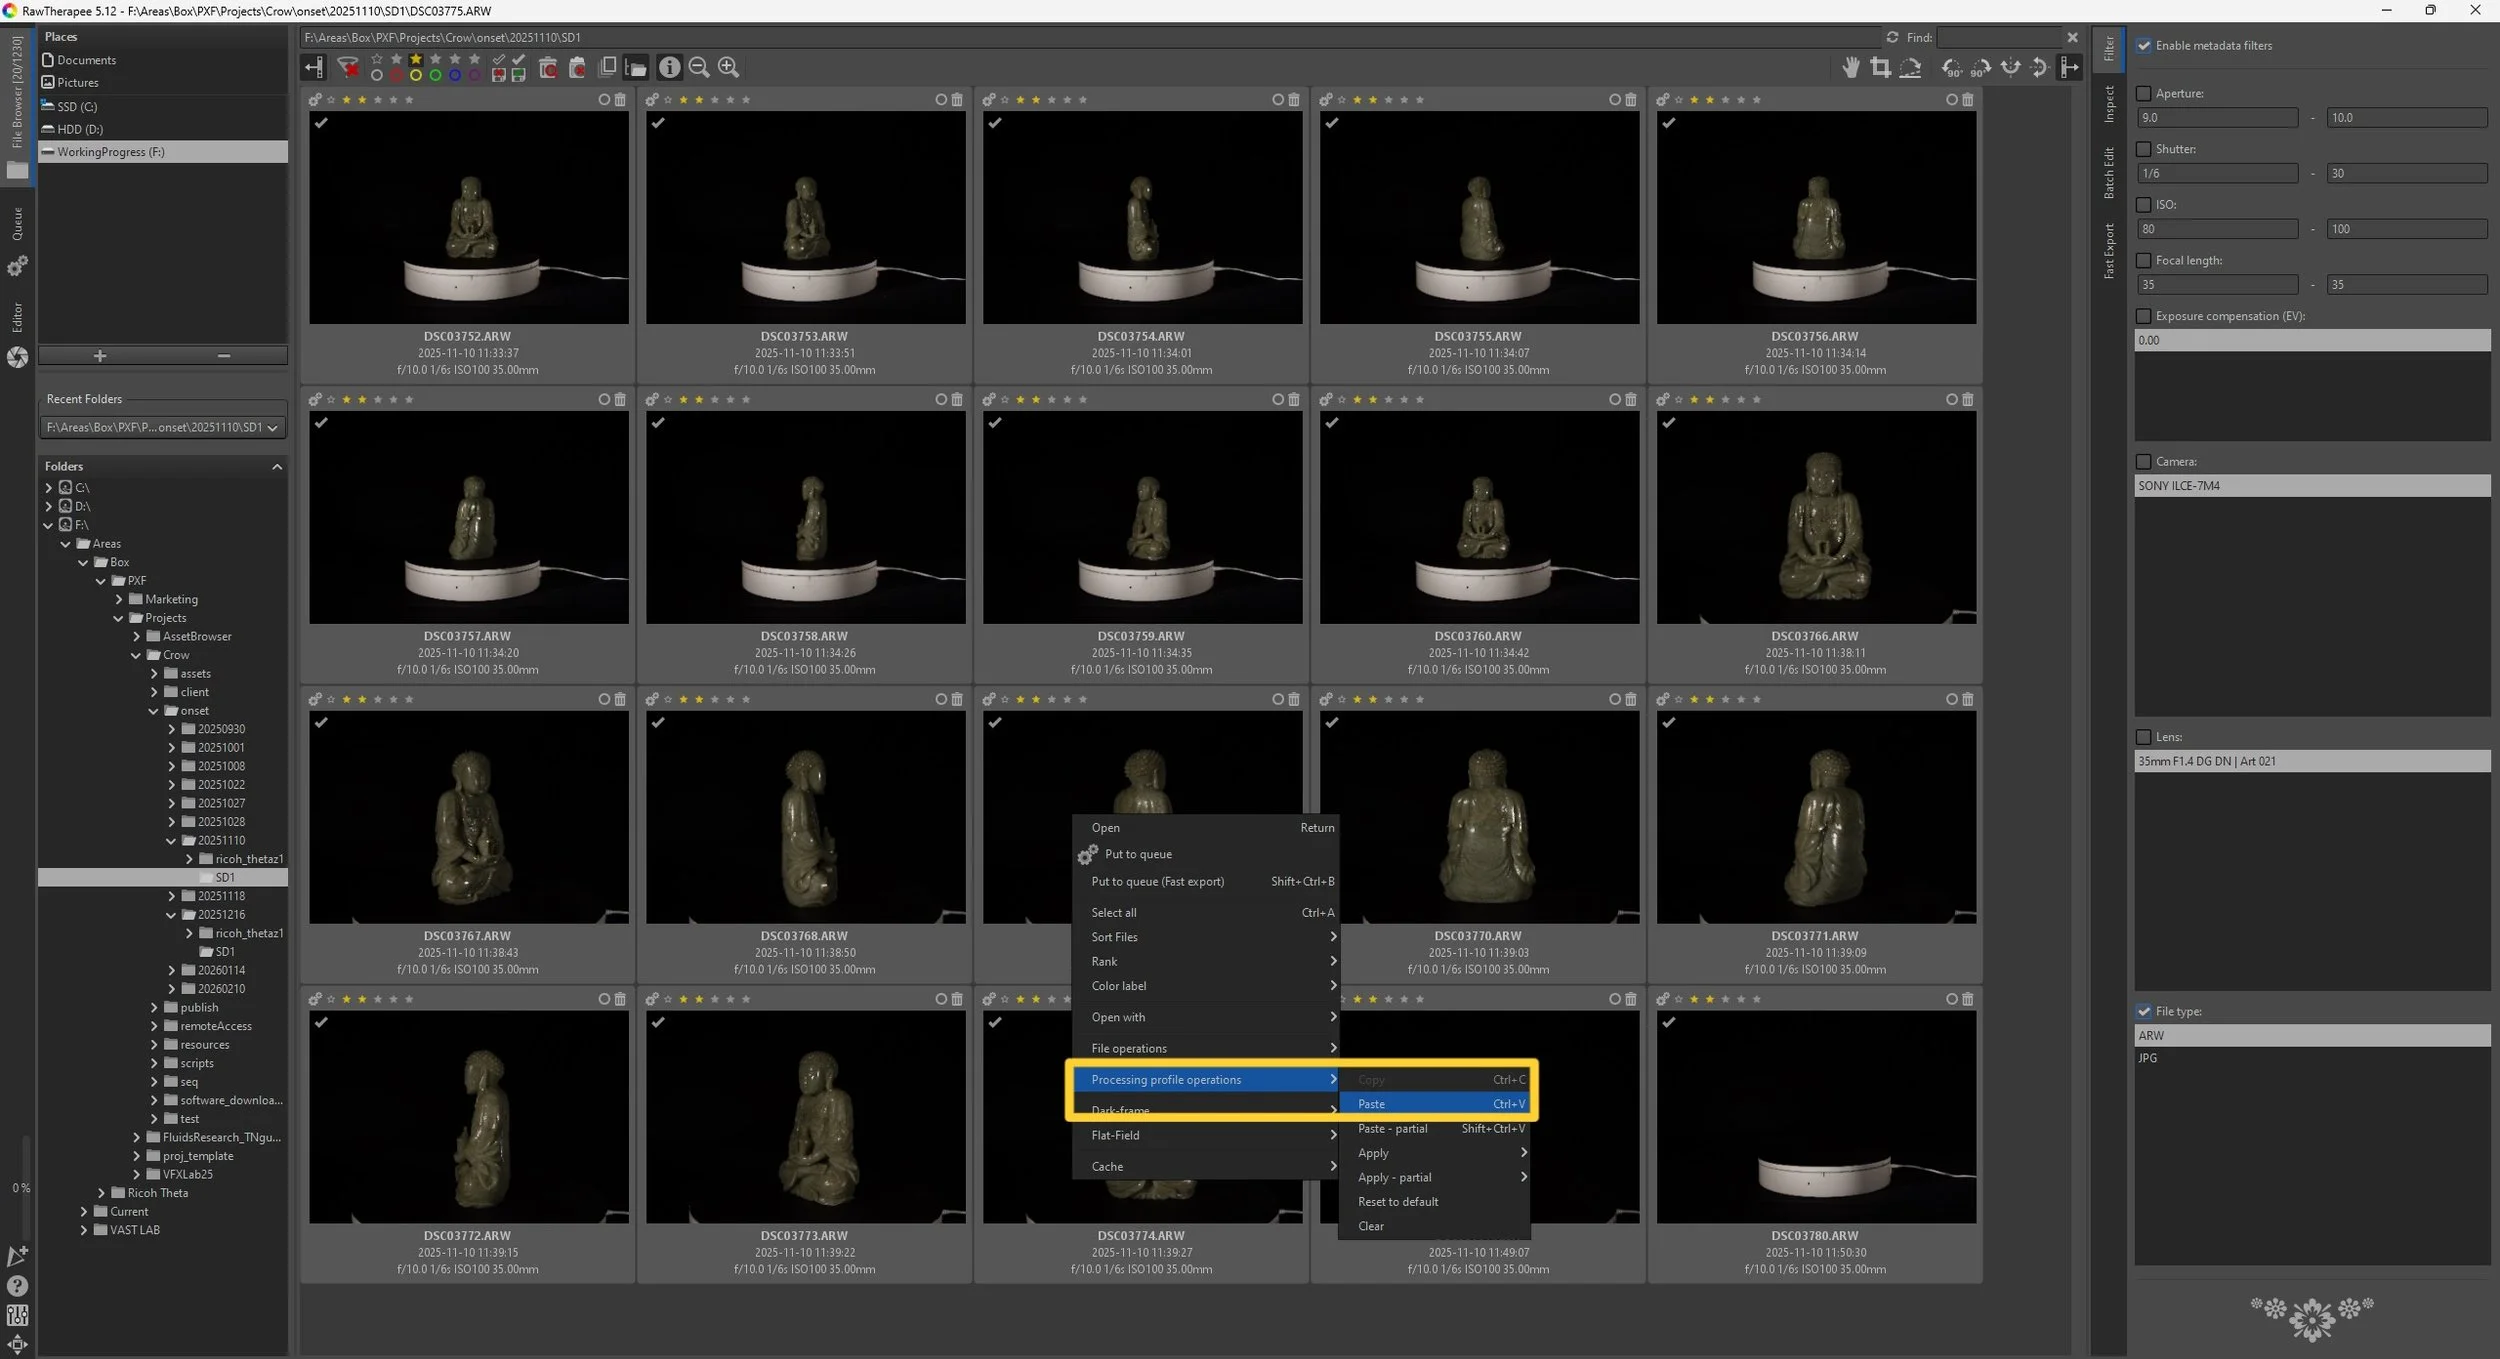
To apply the white balance and calibrated camera profiles:
Right-click processed Macbeth ColorChecker Chart
→ Processing profile operations → Copy
2. Select target images to apply settings→ Processing profile operations → Paste
VII. Queueing and Exporting Processed Images from RawTherapee
After completing the white balancing and camera profile calibration, the final step is to export the processed images from RawTherapee. Instead of saving images individually, the export was handled through RawTherapee’s Batch Queue, which allows multiple images to be processed and exported simultaneously while preserving the applied calibration settings.
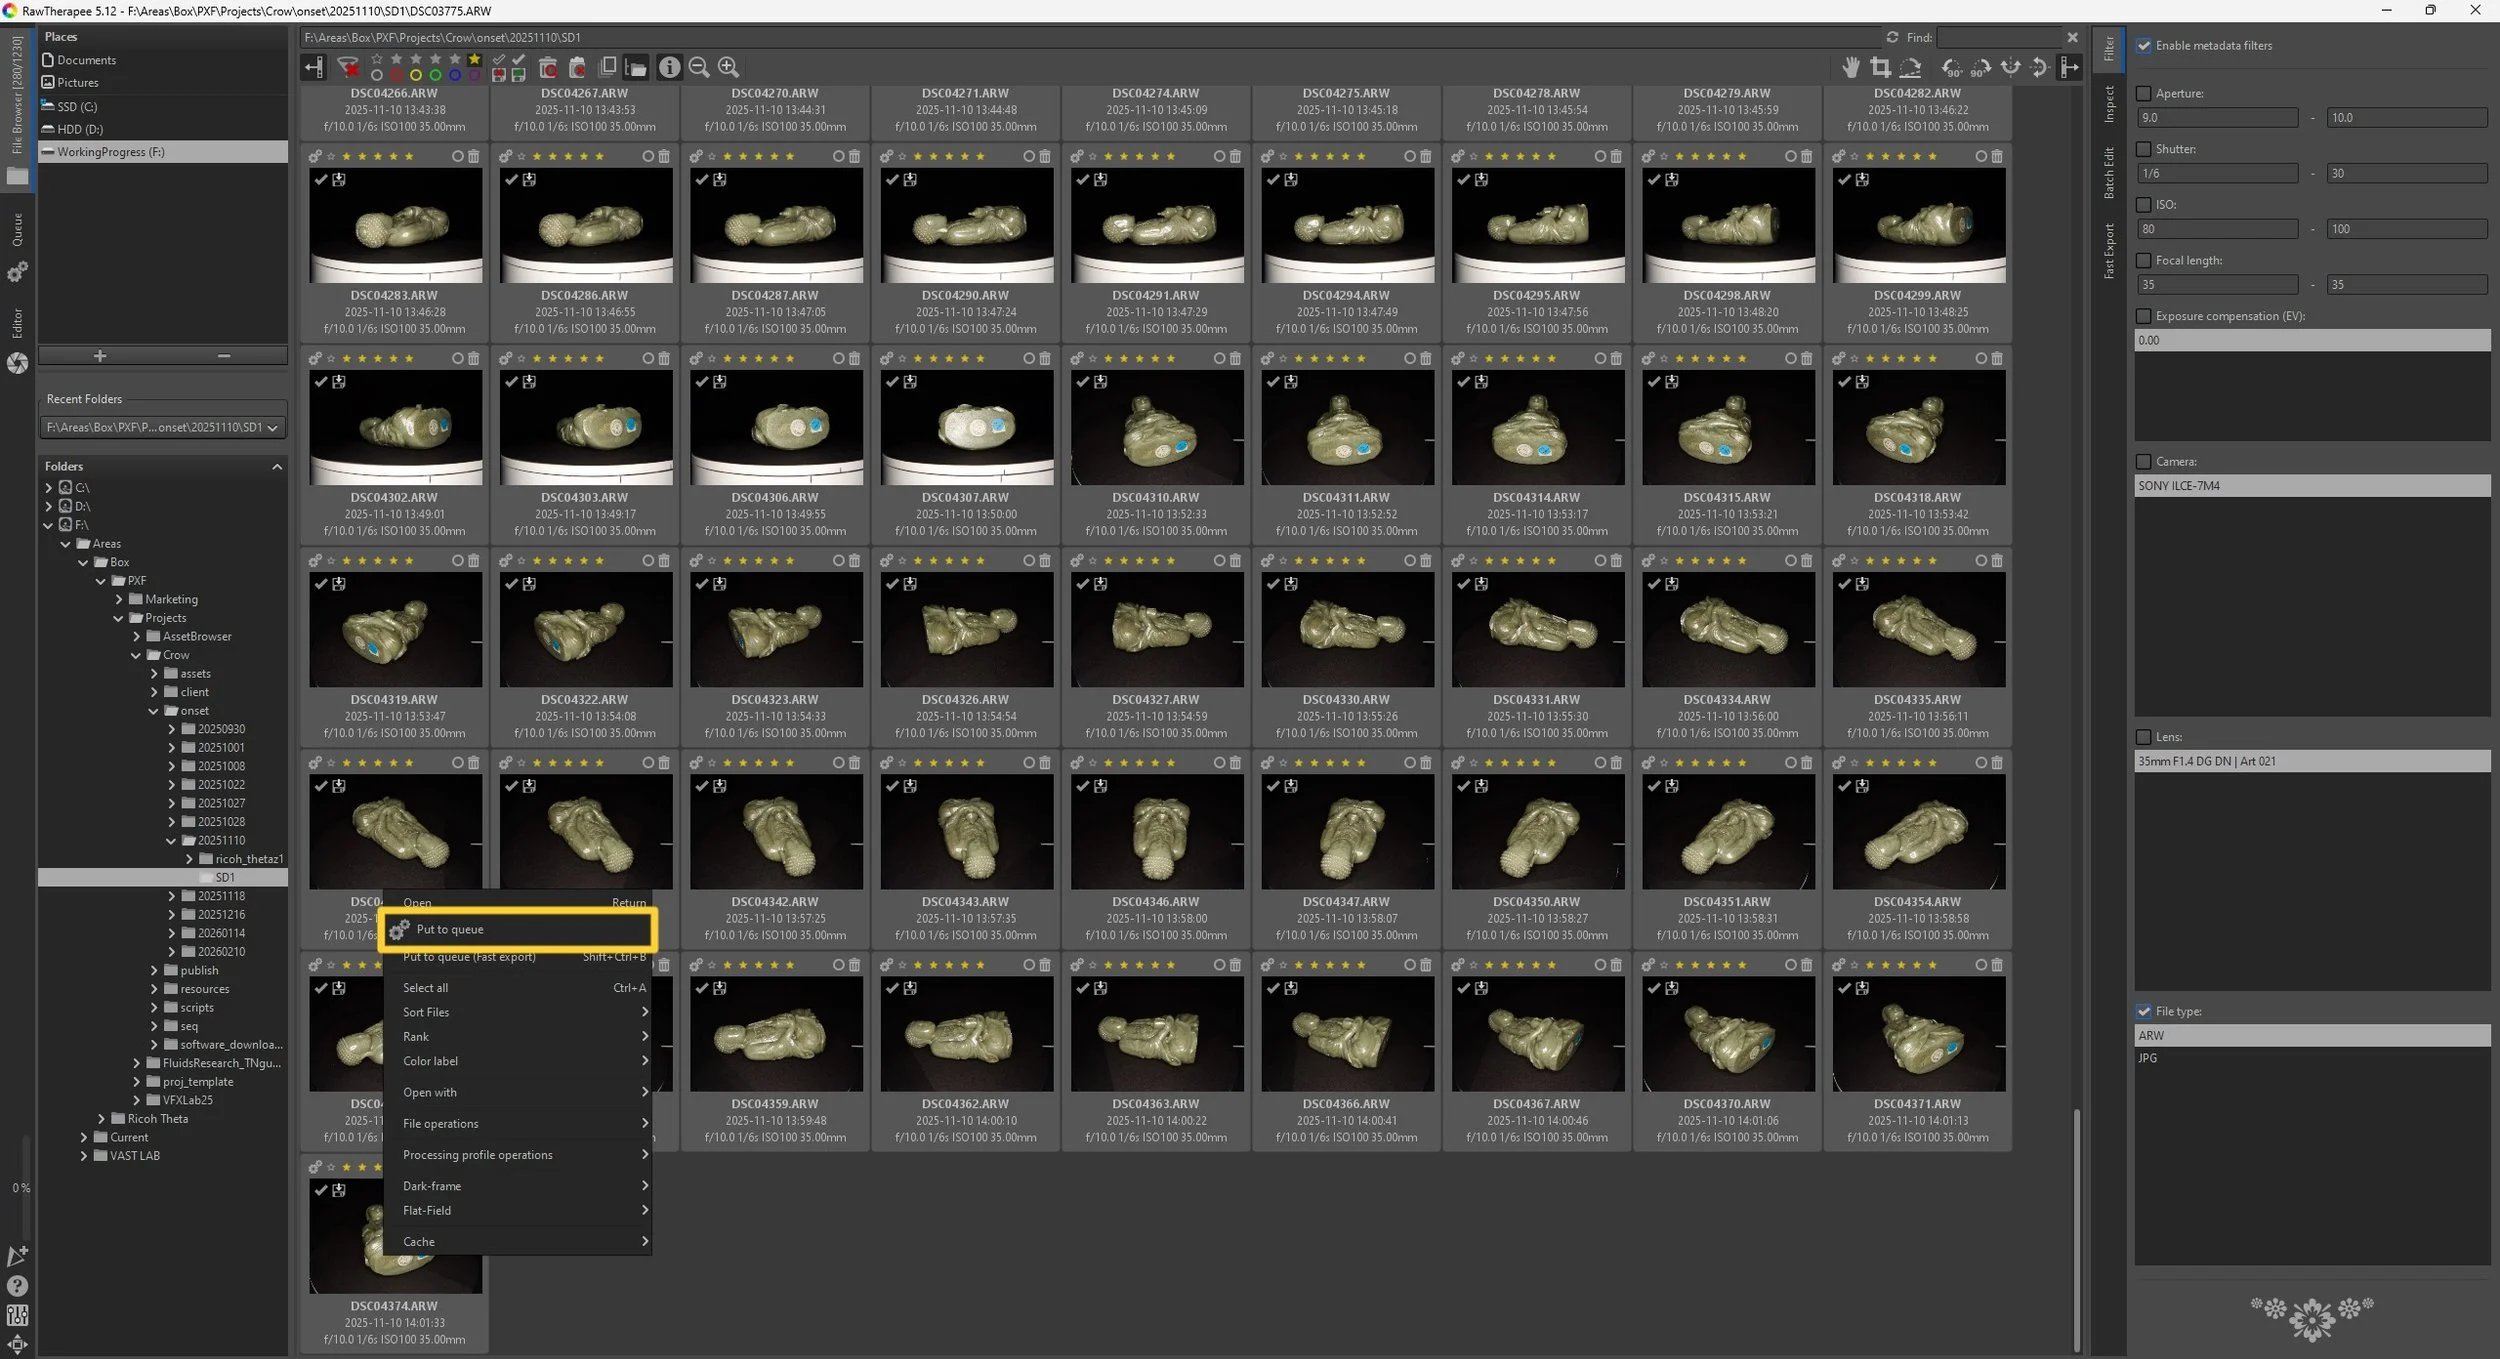
1. Adding Images to the Queue
To export the calibrated images, first select all the images that need to be processed inside the File Browser. After selecting the required thumbnails, right-click on any of the selected images and choose “Put to queue.”
This action sends the selected images to the Queue tab, where they are prepared for batch export using the current processing profile applied to each image.
Using the batch queue ensures that all images are exported consistently with identical calibration settings, which is essential for maintaining uniform exposure, color accuracy, and metadata consistency across the full photogrammetry dataset.
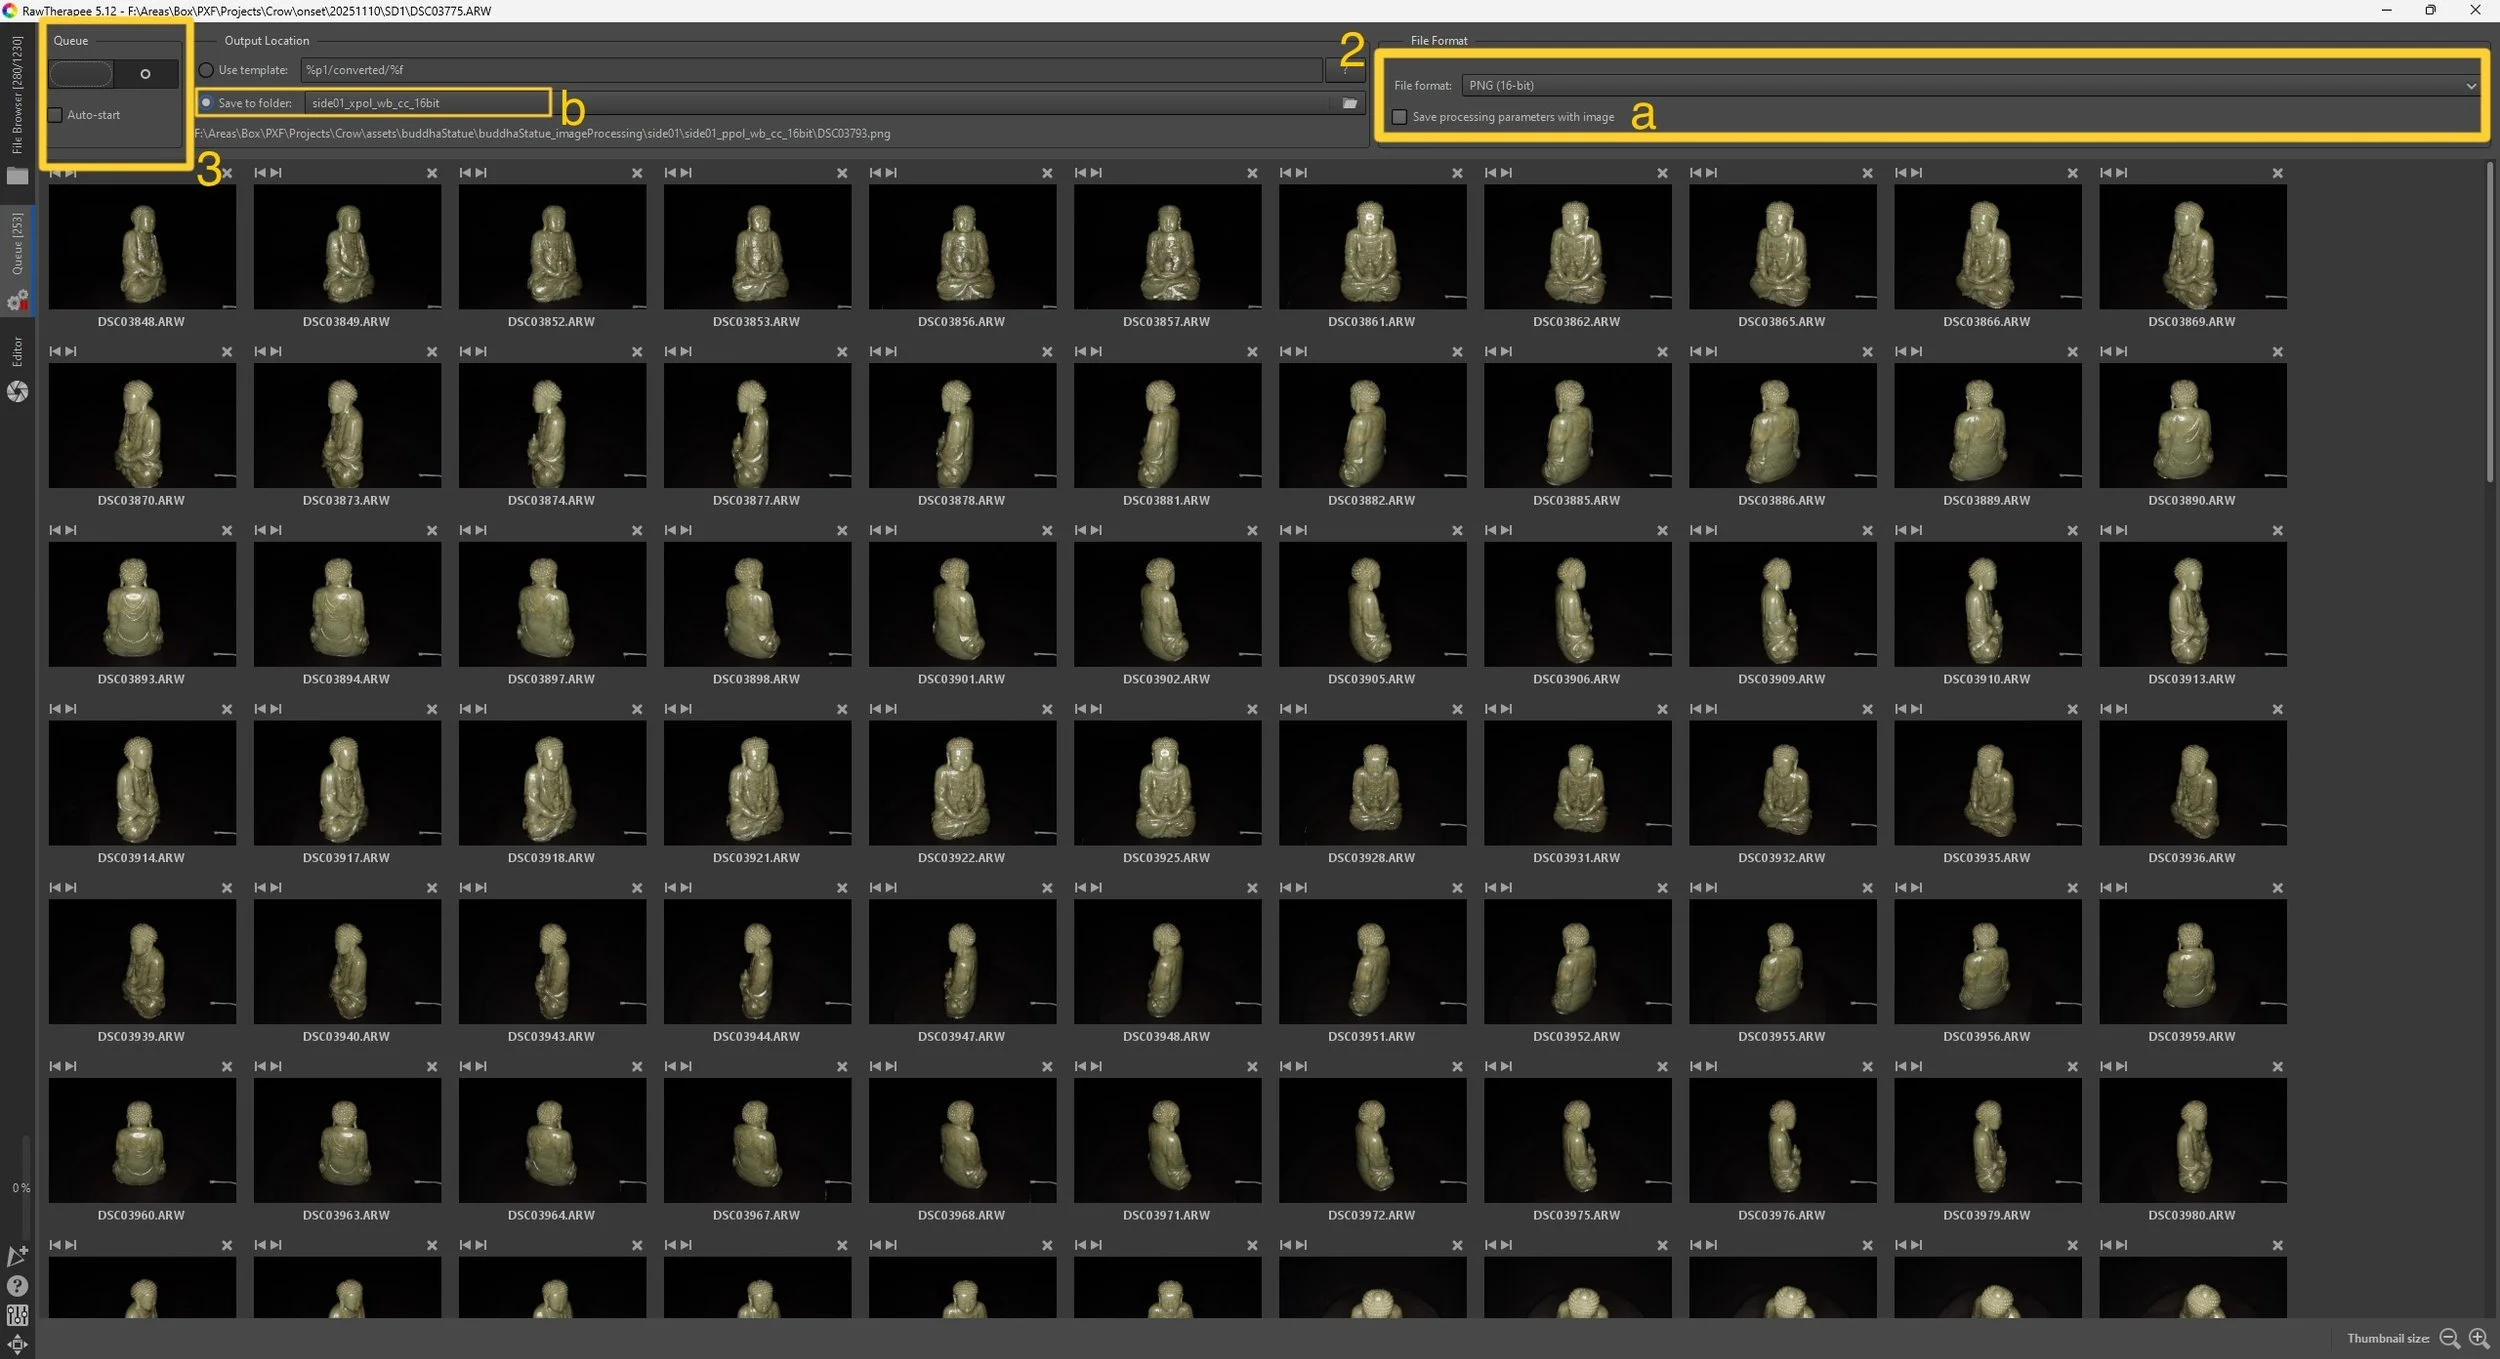
2. Configuring Queue Settings
Inside the Queue tab, several export parameters must be configured before starting the batch process. These include the output file format, bit depth, and destination folder.
For this workflow:
Images were exported primarily as PNG 16-bit files to preserve maximum tonal information and color depth for photogrammetry processing.
PNG 8-bit was used specifically for the cross-polarized (xpol) set where lower bit depth was sufficient for downstream usage.
a. Save Processing Parameters with Image
The “Save processing parameters with image” option creates a .pp3 sidecar file containing the RawTherapee edit settings for each exported image. This is useful for tracking multiple edited versions, but for this workflow it was left unchecked to avoid generating unnecessary sidecar files.
b. Setting the Destination Folder
Enable “Save to folder” and choose the designated processed-images folder path. This ensures exported files are stored separately from the original RAW data and keeps the scan project organized.
3. Running the Batch Export
In the top-left corner of the Queue tab, use the On/Off switch to start the batch processing. When turned on, RawTherapee begins exporting all queued images sequentially using the configured output settings and applied calibration profiles. Once complete, the processed images will appear in the selected destination folder, ready for use in the photogrammetry reconstruction workflow
Output subfolders within ColorChecker, Side01, and Side02 mainFolders:File format within these folders are all PNGs
mainFolder_ppol_wb_cc_16bit
mainFolder_xpol_wb_cc_16bit
mainFolder_xpol_wb_cc_8bit (ONLY for side01 and side02 folders)
Corresponding Processing Groups:
Rank 1: Lighting reference Macbeth ColorChecker Chart -> Rank 2: Lighting reference photos
Rank 3: Cross-polarized Macbeth ColorChecker Chart -> Rank 4: Cross-polarized scan images
Rank 3: Parallel-polarized Macbeth ColorChecker Chart -> Rank 5: Parallel-polarized scan images